Tag Archives for " appear.in "

2

Advanced Testing: Manipulating getUserMedia and Available Devices

Philipp Hancke is not new here on our blog. He has assisted us when we wrote the series on webrtc-internals. He is also not squeamish about writing his own testing environment and sharing the love. This time, he wanted to share a piece of code that takes device availability test automation in WebRTC to a new level.

Obviously… we said yes.

We don’t have that implemented in testRTC yet, but if you are interested – just give us a shout out and we’ll prioritize it.

Both Chrome and Firefox have quite powerful mechanisms for automating getUserMedia with fake devices and skipping the permission prompt.

In Chrome this is controlled by the use-fake-device-for-media-stream and use-fake-ui-for-media-stream command line flags while Firefox offers a preferences media.navigator.streams.fake. See the webdriver.js helper in this repository for the gory details of how to use this with selenium.

However there are some scenarios which are not testable by this:

  • getUserMedia returning an error
  • restricting the list of available devices

While most of these are typically handled by unit tests sometimes it is nice to test the complete user experience for a couple of use-cases

  • test the behaviour of a client with only a microphone
  • test the behaviour of a client with only a camera
  • test the behaviour of a client with neither camera or microphone
  • combine those tests with screen sharing which in some cases replaces the video track on appear.in
  • test audio-only clients interoperating with audio-video ones. The test matrix becomes pretty big at some point.

Those tests are particularly important because as developers we tend to do some manual testing on our own machines which tend to be equipped with both devices. Automated tests running on a continuous integration server help a lot to prevent regressions.

Manipulating APIs with an extension

In order to manipulate both APIs I wrote a chrome extension (which magically works in Firefox and Edge because both support webextensions) that makes them controllable.

An extension can inject javascript into the page on page load as a content script. This has been used in the webrtc-externals extension described on webrtchacks to wrap the whole RTCPeerConnection API.

In our case, the content script replaces the getUserMedia and enumerateDevices functions with wrappers that can be modified at runtime. For example, the enumerateDevices wrapper calls the original function and then uses Javascript to modify the result before returning it to the caller:

    navigator.mediaDevices.enumerateDevices = function() {
        return origEnumerateDevices()
            .then((devices) => {
                if (sessionStorage.__filterVideoDevices) {
                    devices = devices.filter((device) => device.kind !== 'videoinput');
                }
                if (sessionStorage.__filterAudioDevices) {
                    devices = devices.filter((device) => device.kind !== 'audioinput');
                }
                if (sessionStorage.__filterDeviceLabels
                    || sessionStorage.__getUserMediaAudioError === "NotAllowedError"
                    || sessionStorage.__getUserMediaVideoError === "NotAllowedError") {
                    devices = devices.map((device) => {
                        var deviceWithoutLabel = {
                            deviceId: device.deviceId,
                            kind: device.kind,
                            label: '',
                            groupId: device.groupId,
                        }
                        return deviceWithoutLabel;
                    });
                }
                return devices;
            });
    };

The full extension can be found on github. The behaviour is dynamic and can be controlled via sessionStorage flags. With Selenium, one would typically navigate to a page in the same domain, execute a small script to set the session storage flags as desired and then navigate to the page that is to be tested.

We will walk through two examples now:

Use-case: Have getUserMedia return an error and change it at runtime

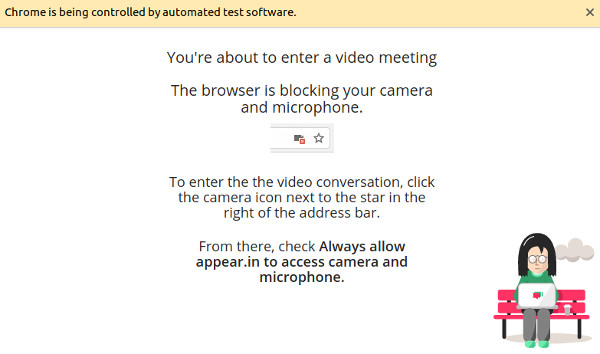
Let’s say we want to test the case that a user has denied permission. For appear.in this leads to a dialog that attempts to help them with the browser UX to change that.

The full test can be found here. As most selenium tests, it consists of a series of simple and straightforward steps:

  • build a selenium webdriver instance that allows permissions and loads the extension
  • go to the appear.in homepage
  • set the List of fake devices in Chrome WebRTC testing  flag to cause a NotAllowedError (i.e. the user has denied permission) as well as an appear.in specific localStorage property that says the visitor is returning — this ensures we go into the flow we want to test and not into the “getUserMedia primer” that is shown to first-time users.
  • join an appear.in room by loading the URL directly.
  • the next step would typically be asserting the presence of certain DOM elements guiding the user to change the denied permission. This is omitted here as those elements change rather frequently and replaced with a three second sleep which allows for a visual inspection. It should look like this:
  • the List of fake devices in Chrome WebRTC testing  flag is deleted
  • this eventually leads to the user entering the room and video showing up. We do some magic here in order to avoid having to ask the user to refresh the page.

Watch a video of this test running below:


Incidentally, that dialog had a “enter anyway” button which, due to the lack of testing, was not visible for quite some time without anyone noticing because the visual regression tests could not access this stage. Now that is possible.

Restricting the list of available devices

The fake devices in both Chrome and Firefox return a stream with exactly those properties that you ask for and they always succeed (in Chrome there is a way to make them always fail too). In the real world you need to deal with users who don’t have a microphone or a camera attached to their machine. A call to getUserMedia would fail with a NotFoundError (note the recent change in Chrome 64 or simply use adapter.js and write spec-compliant code today).

The common way to avoid this is to enumerate the list of devices to figure out what is available using enumerateDevices by pasting this into the javascript console:

navigator.mediaDevices.enumerateDevices().then(devices => {
 const hasMicrophone = devices.some(device => device.kind === “audioinput”);
 console.log(‘has microphone’, hasMicrophone);
});


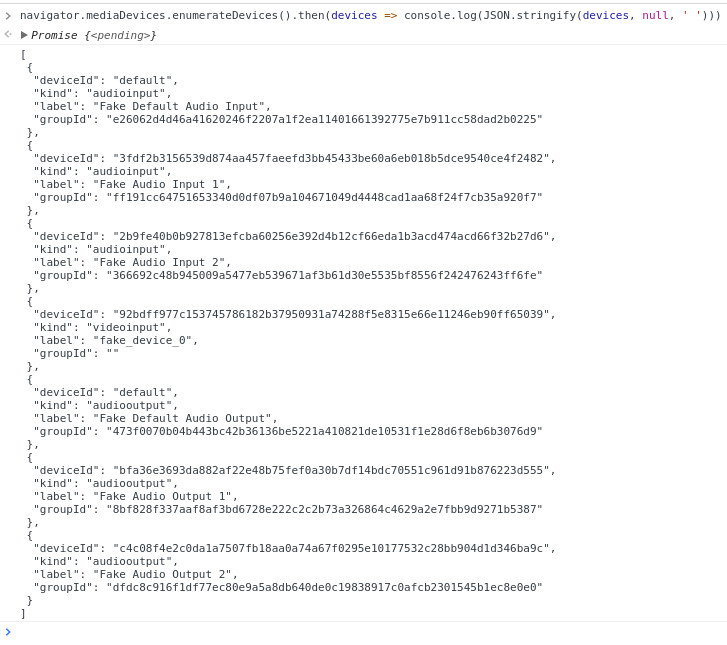
When you run this together with the fake device flag you’ll notice that it provides two fake microphones and one fake camera device:

When the extension is loaded (which for manual testing can be done on chrome://extensions; see above for the selenium ways to do it) one can manipulate that list:

sessionStorage.__filterAudioDevices = true;

Paste the enumerateDevices into the console again and the audio devices no longer show up:

At appear.in we used this to replace a couple of audio-only and video-only tests that used feature flags in the application code with more realistic behaviour. The extension allows a much cleaner separation between the frontend logic and the test logic.

Summary

Using a tiny web extension we could easily extend the already powerful WebRTC testing capabilities of the browsers and cover more advanced test scenarios. Using this approach it would even be possible to simulate events like the user unplugging the microphone during the call.

5

Just Landed: Automated WebRTC Screen Sharing Testing in testRTC

Well… this week we had a bit of a rough start, but we’re here. We just updated our production version of testRTC with some really cool capabilities. The time was selected to fit with the vacation schedule of everyone in this hectic summer and also because of some nagging Node.js security patch.

As always, our new release comes with too many features to enumerate, but I do want to highlight something we’ve added recently because of a couple of customers that really really really wanted it.

Screen sharing.

Yap. You can now use testRTC to validate the screen sharing feature of your WebRTC application. And like everything else with testRTC, you can do it at scale.

This time, we’ve decided to take appear.in for a spin (without even hinting anything to Philipp Hancke, so we’ll see how this thing goes).

First, a demo. Here’s a screencast of how this works, if you’re into such a thing:

Testing WebRTC Screen Sharing

There are two things to do when you want to test WebRTC screen sharing using testRTC:

  1. “Install” your WebRTC Chrome extension
  2. Show something interesting

#1 – “Install” your WebRTC Chrome extension

There are a couple of things you’ll need to do in the run options of the test script if you want to use screen sharing.

This is all quite arcane, so just follow the instructions and you’ll be good to go in no time.

Here’s what we’ve placed in the run options for appear.in:

#chrome-cli:auto-select-desktop-capture-source=Entire screen,use-fake-ui-for-media-stream,enable-usermedia-screen-capturing #extension:https://s3-us-west-2.amazonaws.com/testrtc-extensions/appearin.tar.gz

The #chrome-cli thingy stands for parameters that get passed to Chrome during execution. We need these to get screen sharing to work and to make sure Chrome doesn’t pop up any nagging selection windows when the user wants to screen share (these kills any possibility of automation here). Which is why we set the following parameters:

  • auto-select-desktop-capture-source=Entire screen – just to make sure the entire screen is automatically selected
  • use-fake-ui-for-media-stream – just add it if you want this thing to work
  • enable-usermedia-screen-capturing – just add it if you want this thing to work

The #extension bit is a new thing we just added in this release. It will tell testRTC to pre-install any Chrome extensions you wish on the browser prior to running your test script. And since screen sharing in Chrome requires an extension – this will allow you to do just that.

What we pass to #extension is the location of a .tar.gz file that holds the extension’s code.

Need to know how to obtain a .tar.gz file of your Chrome extension? Check out our Chrome extension extraction guide.

Now that we’ve got everything enabled, we can focus on the part of running a test that uses screen sharing.

#2 – Show something interesting

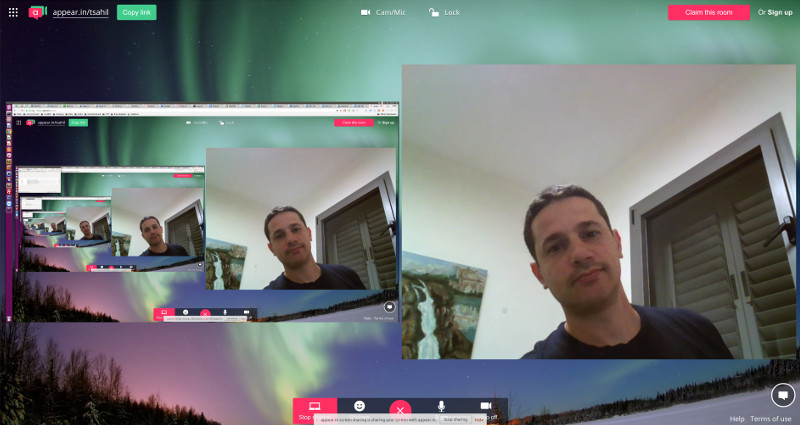
Screen sharing requires something interesting on the screen, preferably not an infinite video recursion of the screen being shared in one of the rectangles. Here’s what you want to avoid:

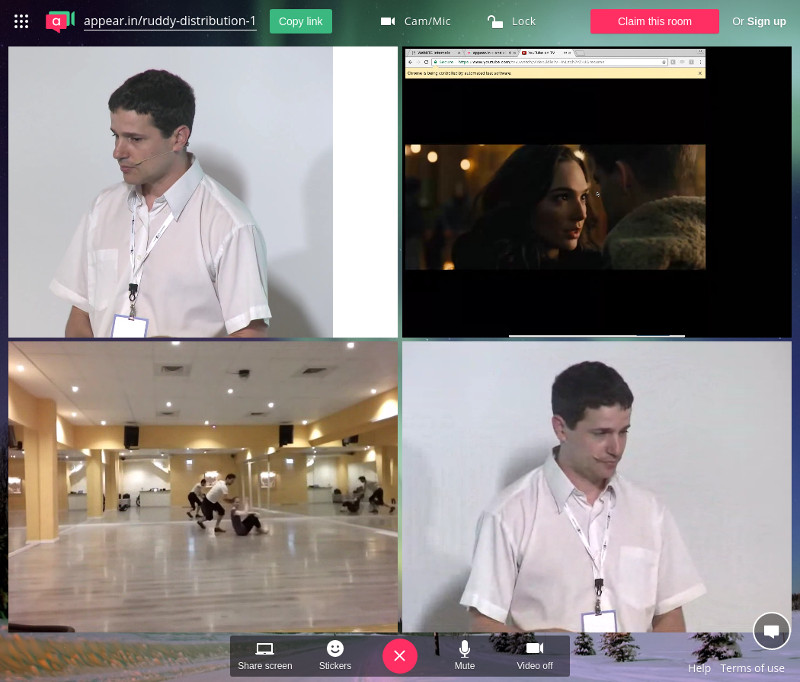
And this is what we really want to see instead:

The above is a screenshot that got captured by testRTC in a test scenario.

You can see here 4 participants where the top right one is screen sharing coming from one of the other participants.

How did we achieve this in the code?

Here are the code snippets we used in the script to get there:

var videoURL = "https://www.youtube.com/tv#/watch?v=INLzqh7rZ-U";

client
   .click('.VideoToolbar-item--screenshare.jstest-screenshare-button')
   .pause(300)
   .rtcEvent('Screen Share ' + agentSession, 'global')
   .rtcScreenshot('screen share ')
   .execute("window.open('" + videoURL + "', '_blank')")
   .pause(5000)

   // Switch to the YouTube
   .windowHandles(function (result) {
       var newWindow;
       newWindow = result.value[2];
       this.switchWindow(newWindow);
   })
   .pause(60000);
   .windowHandles(function (result) {
       var newWindow;
       newWindow = result.value[1];
       this.switchWindow(newWindow);
   });

We start by selecting the URL that will show some movement on the screen. In our case, an arbitrary YouTube video link.

Once we activate screen sharing in appear.in, we call rtcEvent which we’ve seen last time (and is also a new trick in this new release). This will add a vertical line on the resulting graphs so we know when we activated screen sharing (more on this one later).

We call execute to open up a new tab with our YouTube link. I decided to use the youtube.com/tv# URL to get the video to work close to full screen.

Then we switch to the YouTube in the first windowHandles call.

We pause for a minute, and then go back to the appear.in tab in the browser.

Let’s analyze the results – shall we?

Reading WebRTC screen sharing stats

Screen sharing is similar to a regular video channel. But it may vary in resolution, frame rate or bitrate.

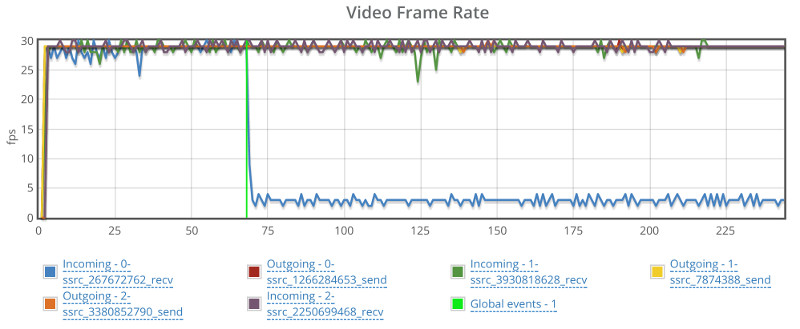
Here’s how the appear.in graphs look like on one of the receiving browsers in this test run. Let’s start with the frame rate this time:

Two things you want to watch for here:

  1. The vertical green line – that’s where we’ve added the rtcEvent call. While it was added to the browser who is sending screen sharing, we can see it on one of the receiving browsers as well. It gets us focused on the things of interest in this test
  2. The incoming blue line. It starts off nicely, oscillating at 25-30 frames per second, but once screen sharing kicks in – it drops to 2-4 frames per second – which is to be expected in most scenarios

The interesting part? Appear.in made a decision to use the same video channel to send screen sharing. They don’t open an additional video channel or an additional peer connection to send screen sharing, preferring to repurpose an existing one (not all services behave like that).

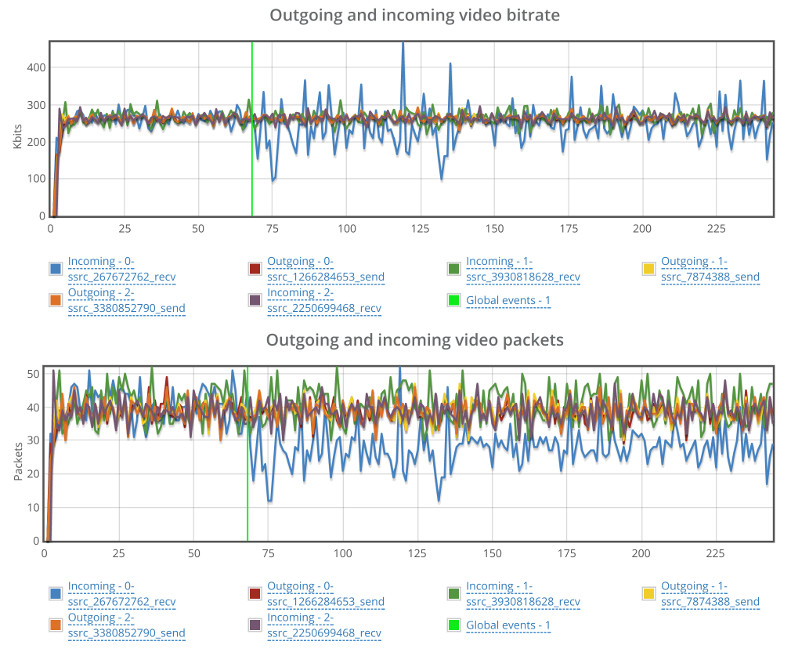
Now let’s look at the video bitrate and number of packets graphs:

The video bitrate still runs at around 280 kbps, but it oscillates a lot more. BTW – I am using the mesh version of appear.in here with 4 participants, so it is going low on bitrate to accommodate for it.

The number of video packets per second on that incoming blue line goes down from around 40 to around 25. Probably due to the lower number of frames per second.

What else is new in testRTC?

Here’s a partial list of some new things you can do with testRTC

  • Manual testing service
  • Custom network profiles (more about it here)
  • Machine performance collection and visualization
  • Min/max bands on high level graphs
  • Ignore browser warnings and errors
  • Self service API key regeneration
  • Show elapsed time on running tests
  • More information in test runs on the actual script and run options used
  • More information across different tables and data views

Want to check screen sharing at scale?

You can now use testRTC to automate your screen sharing tests. And the best part? If you’re doing broadcast or multiparty, you can now test these scales easily for screen sharing related issues as well.

If you need a hand in setting up screen sharing in our account, then give us a shout and we’ll be there for you.

11

How do WebRTC Media Servers Behave on Packet Loss?

Differently from each other.

Whenever I see people comparing WebRTC media servers, they tend to focus on scale:

– How many sessions can you cram in parallel?

– How many streams can you serve from a single machine?

– How much bitrate can you pump out?

All of these are very important questions – they end up in your sizing calculation that then go into your pricing model for your service. Oh, and we did cover this a bit here when talking about handling WebRTC browsers synchronization at scale.

Now that our new version is taking shape (still in staging, so if you want access – ping us), it is time to play a bit with a few new toys we’ve added for our beloved community of sadists (you may know them as test engineers, but the good ones are sadists – they like inflicting pain upon digital products and services).

What I am talking about here is a combination of two script commands we have:

  1. rtcEvent() – place a vertical event in the graphs
  2. rtcSetNetworkProfile() – change network profiles in runtime

You’ll see how it looks in a second.

What Packet Loss Does?

Packet loss is bad.

You don’t control it. And it can happen at any time. Come and go as it pleases.

The moment you have packet loss, there will be some degradation in the quality of the media. Lost packets means lost data. Means can’t playback something. It might be minor. It might be important.

Next thing that happens? WebRTC (or most other VoIP products for that matter) will start lowering bitrates. Why? Because it assumes there’s congestion on the network, and it is trying to play nice with everyone.

But what happens once that packet loss is gone? Does things go back to normal? And if they do, then how fast will that happen?

My Experiment

I decided to devise a simple enough experiment to get some answers here. I chose the following steps:

  1. Connect to a service
  2. Run for a full minute
  3. Set packet loss to 10% for a full minute
  4. Go back to normal – no packet loss
  5. Wait two minutes

That’s it. What I am interested in is less of what happens during the second minute, but more what happens in the last two minutes, and how that is different than what we have in the first minute of the session.

In general, I decided to place 5 users in the same session, to get that media server working a bit. And I also decided to focus on the SFU kind.
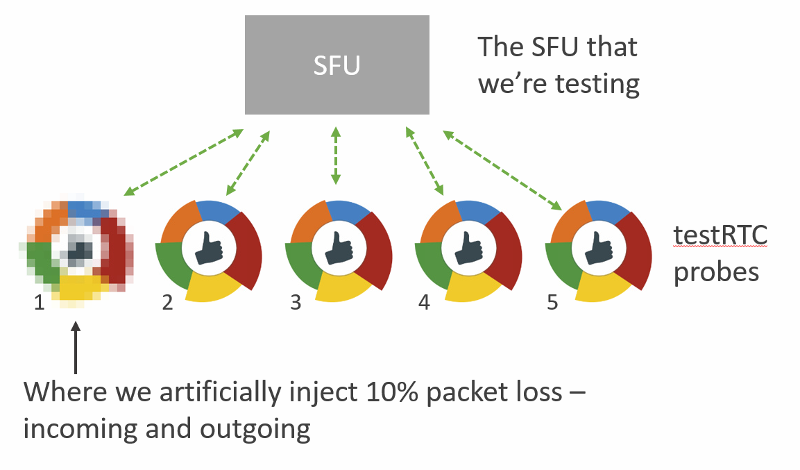
The services I tinkered with are:

  1. AppRTC, just as a baseline for this exercise
  2. Janus, an open source media framework, that can act as an SFU
  3. Jitsi Videobridge, an open source SFU
  4. mediasoup, a relatively new open source SFU
  5. SwitchRTC, a commercial SFU
  6. appear.in, a service that recently added its own self-developed SFU (in beta at the moment)

If you are looking for Kurento or other SFUs – they weren’t included not because I didn’t want to, but because there was no readily available installation out there that I could just use.

I’ll be happy to add more SFUs to the comparison, so give us a shout out if you want to run such an analysis.

Let the fun begin.

AppRTC – My Favorite Baseline

For our baseline, I decide to use AppRTC.

This time, I had to use only 2 browsers, as AppRTC doesn’t support any group calling capabilities.

What it does do is offer the vinyl WebRTC experience.

I started with writing a simple script to fit my needs:

var roomUrl = process.env.RTC_SERVICE_URL + "testRTC" + process.env.RTC_SESSION_IDX + '?vsc=VP8';

var agentType = Number(process.env.RTC_IN_SESSION_ID);
var recuperationTime = 60; // in seconds

client
   .rtcInfo(roomUrl)
   .rtcProgress('open ' + roomUrl)
   .url(roomUrl)
   .waitForElementVisible('body', 60000)
   .pause(2000)
   .click('#confirm-join-button')
   .waitForElementVisible('#videos', 20000)
// Minute 1
   .pause(recuperationTime * 500)
   .rtcScreenshot('Phase 1')
   .rtcProgress('Phase 1')
   .pause(recuperationTime * 500);

// Minute 2
   if (agentType === 1) {
   client
       .rtcEvent('10% Packet Loss start', 'global')
           .rtcSetNetworkProfile('custom', 'packet loss', 10, 'both', 'both'); // 10% packet loss
   }

client
   .pause(recuperationTime * 500)
   .rtcScreenshot('Phase 2')
   .rtcProgress('Phase 2')
   .pause(recuperationTime * 500)

   if (agentType === 1) {
    client
       .rtcSetNetworkProfile('') // back to pristine network conditions
       .rtcEvent('10% Packet Loss End', 'global');
   }

// Minute 3-4
client
   .pause(recuperationTime * 1000)
   .rtcScreenshot('Phase 3')
   .rtcProgress('Phase 3')
   .pause(recuperationTime * 1000);

A few things to note here:

  1. All test scripts on this post can be found on our github account. Easiest way to use them is to import them into your testRTC account
  2. I decided to force VP8 here. VP9 is erratic a bit in its bitrate so I wanted to go for VP8 – hence the addition of ‘?vsc=VP8’ in the first line of this script (check out all of AppRTC’s parameters here)
  3. When the second minute is up, the first probe in each session will generate a global rtcEvent and set packet loss in both directions to 10% (look at lines 23-27)
  4. After an additional second is over, the first probe in each session will generate another global rtcEvent and remove all packet loss and network constraints that might have been used (look at lines 35-39)

Running that using testRTC yields these results once you drill into one of these sessions:
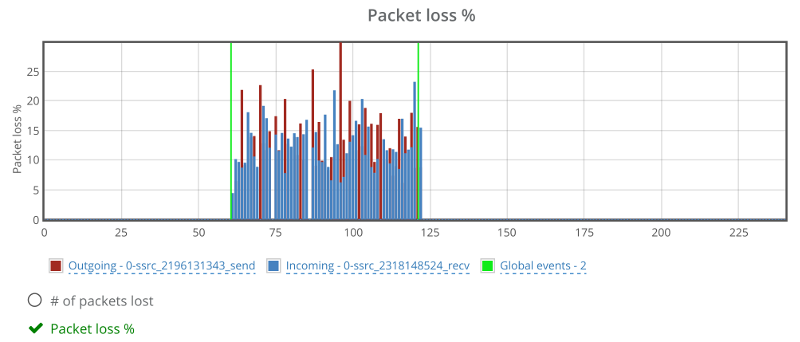
Above you see two things:

  1. The green vertical lines – these are the result of the rtcEvent() calls
  2. The blue and red bars, showing incoming and outgoing packet loss percentage, which averages at 10%
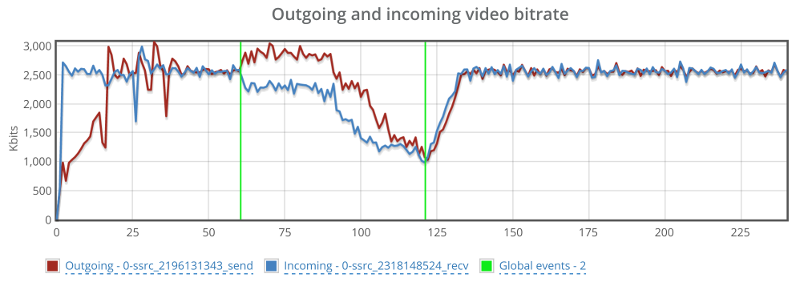
Above you see the video bitrate graph, with the two horizontal lines on it.

Notice how the outgoing bitrate tries going up in the beginning and then drops from 2.5mbps to 1mbps in 60 seconds?

The other thing that interest me is the time it takes for WebRTC/AppRTC to get back to 2.5mbps. And that’s somewhere in the range of 15-20 seconds.

Oh, and because I know you’ll be interested in this – also remember this screenshot of the video average delay we had:
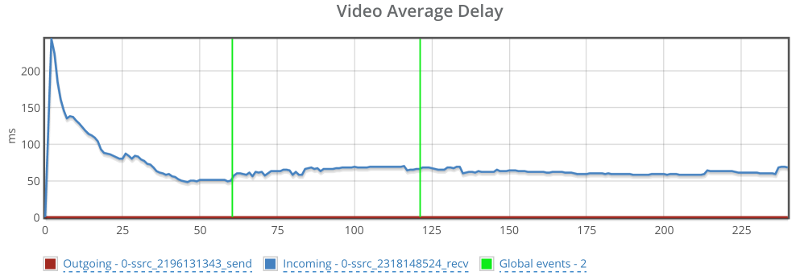
Before we move on to the media servers – remember that what I tried doing with AppRTC is provide a baseline. And the baseline here is “picture perfect”. I didn’t really expect any of the SFUs that I’ve used to be able to match AppRTC with its metrics.

Janus

Janus is an open source media server created and maintained by Meetecho.

They have an online demo running that supports a simple video room.

So we just hooked our script on top of that to get the results we needed. We aimed for 5 browsers in a single room – which will be the norm from now on in this article.

The Janus demo has somewhat of a single room, and I had to end up with a J3rry user in there, though he seemed harmless with no camera or bitrate in my session.
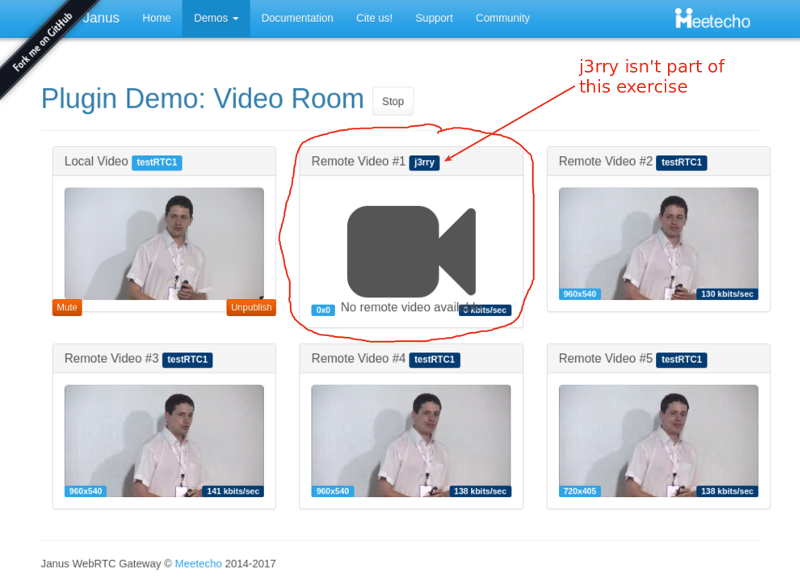
You can see above that the bitrates are rather low – around 140 kbps for each video stream coming into this room. And that’s even before I started adding packet loss.

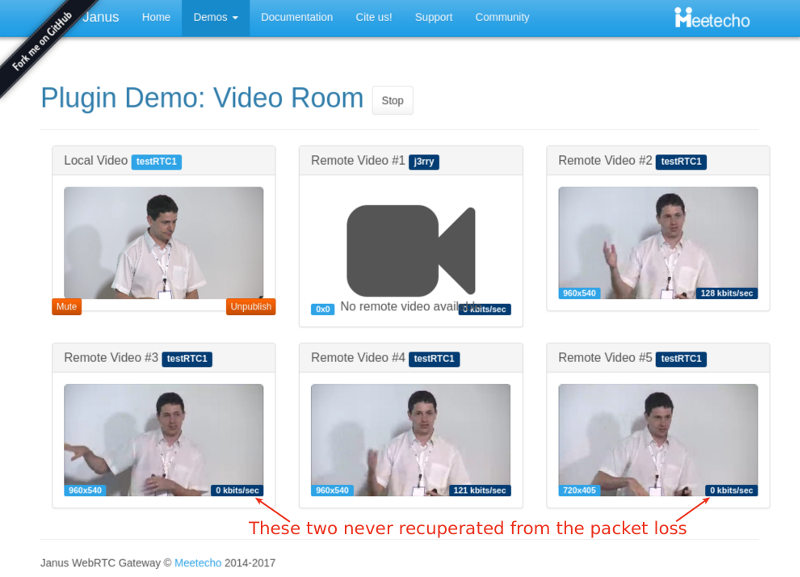
During packet loss and after it, we “lost” two participants. Here’s a screenshot taken a minute after I stopped packet loss altogether:
The graphs in testRTC show a grim picture:
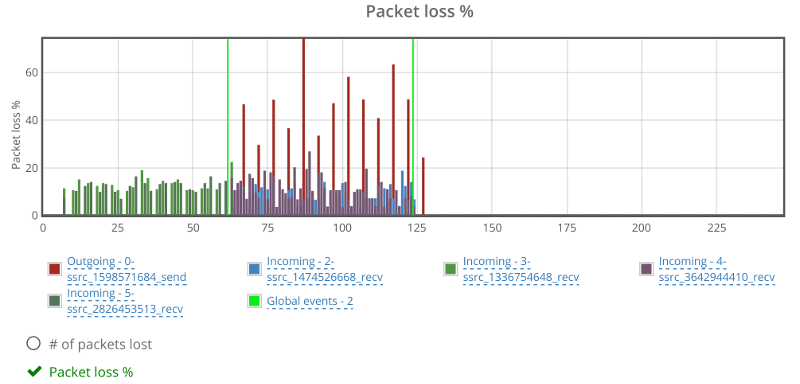
Janus reports packet losses at higher intervals than what WebRTC does, which is why we see the spikes on the outgoing reporting that go up to 50% and more. The weird thing is the two incoming channels that show around 10% of packet loss as well. Which is weird – more about this later.

Here’s how video bitrates look like for some of the streams (one outgoing and two incoming):
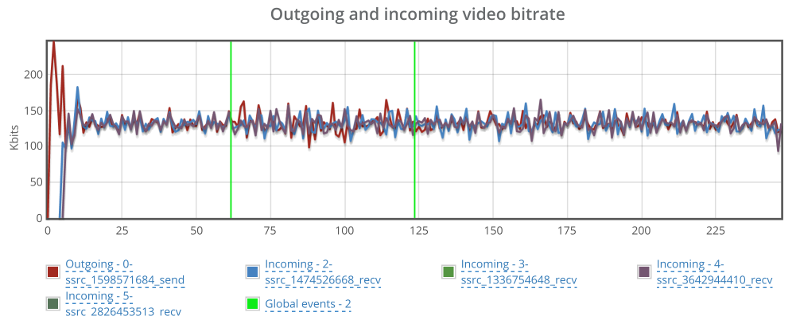
No change even though we have packet loss.

And here’s what happens in the two other incoming streams:
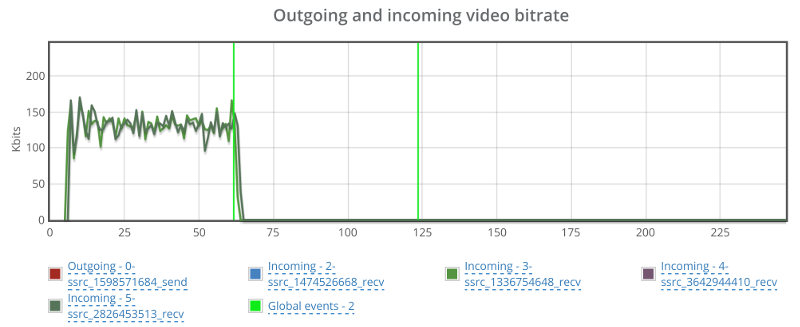
Apparently, these two incoming streams are the ones showing packet loss from the start. They somehow decided to drop to 0 the moment we cranked up the artificial packet loss from 0 to 10% – but never recuperated from it.

Looking at the average delay for the video…
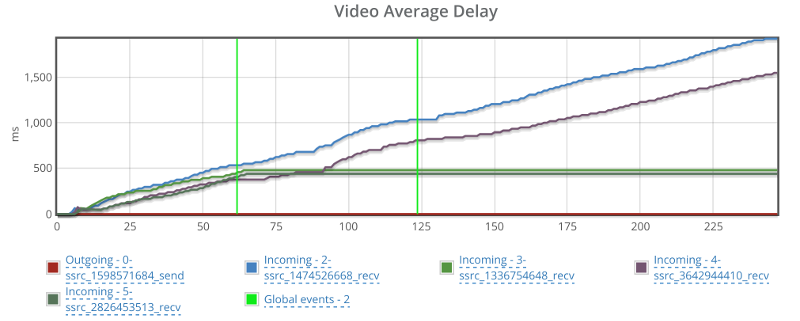
Things can’t be good, but seems like this has nothing to do with my packet loss shenanigans.

It might be Janus and it might just be the demo machine. If I could, I’d reboot it and start all over again.

Jitsi

For me the Jitsi Videobridge is where I go first to run demos and tests on an SFU with testRTC:

  • It is out there
  • It is easy to automate
  • And I am a creature of habit…

To run our test here, we’ve directed 5 of our probes into a single room on the Jitsi meet online service/demo.

After a few attempts, I decided it would be better to disable simulcast, using this prefix to the URL: ‘#config.disableSimulcast=true’. I didn’t do it because simulcast is a bad thing, but because it made analyzing the results much harder for what I had in mind.

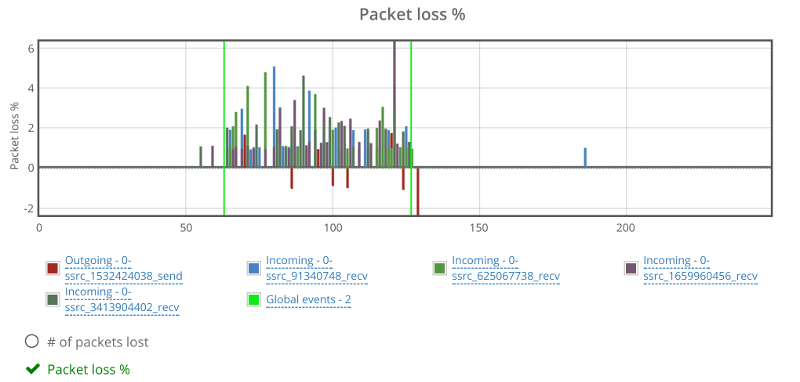
If we look at the packet loss graph, it will tell a similar story to what we’ve seen so far:
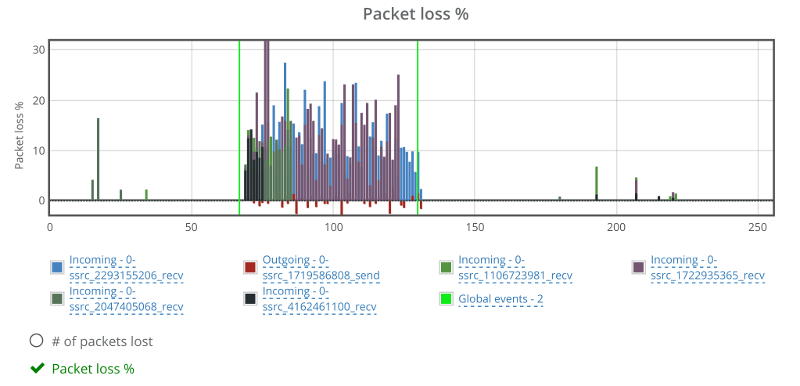
While there are some packet losses out of the one minute killzone I created, they are negligible (or at least sporadic). That negative values you see for packet losses in the red color? They are reports of the browser’s outgoing stream from the machine we induced packet loss on. This is most probably related to a Chrome bug (HT to Philipp Hancke).

I’ve split the video bitrate graphs here into two graphs – the outgoing one and the incoming ones since they tell two separate stories.
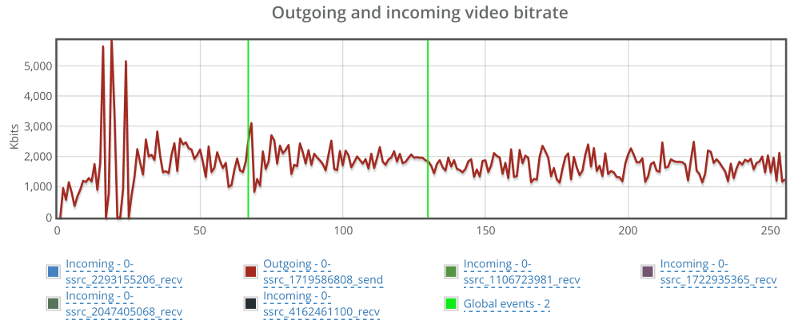
This one caught me by surprise – the outgoing bitrate shows no signs of a change due to packet loss. I wonder what Jitsi is doing (or not doing) to have packet loss ignored in such a way. So I decided to look at it from the receiving end of one of the other four browsers in the same session:
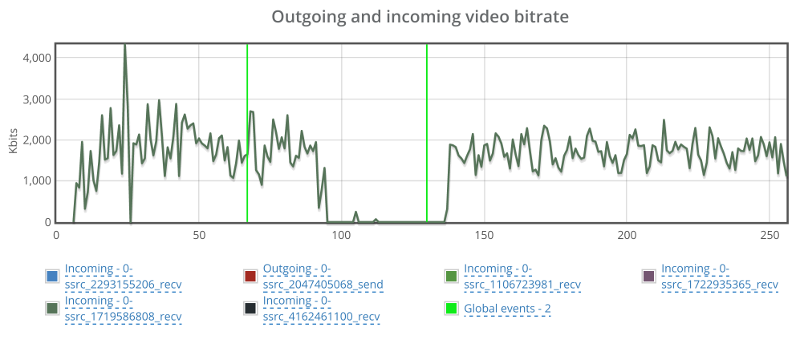
Bitrate drops to 0 for a duration of almost a full minute before coming back up.

Back to the browser with the trashed network, let’s see what happens to the incoming video streams:
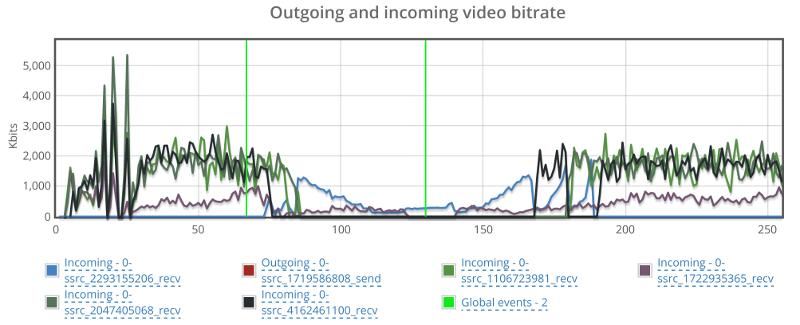
Things drop down from around 2mbps to almost 0 on all incoming channels, taking around 40-60 seconds to get back to normal.

One last glance before we move on – check out video average delay:
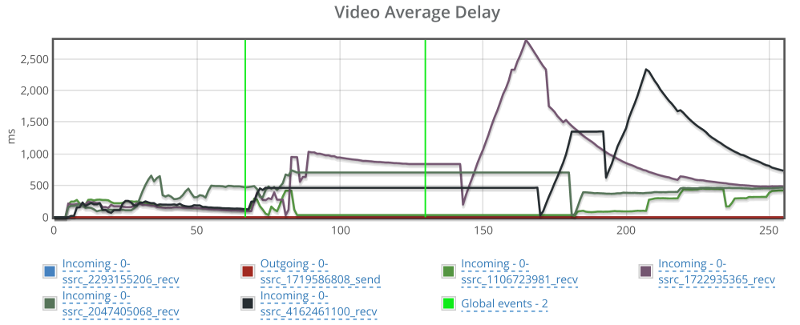
Jitsi had some hard time recuperating from that packet loss.

It should be noted that I’ve played around with Jitsi before their recent updates – especially the ones including adaptivity.

Mediasoup

mediasoup is a rather new player in the open source SFU space. It is built in C++ as a Node.js module. After a quick Twitter chat, Iñaki Baz Castillo was kind enough to configure it to my needs (specifically, allowing for more bandwidth on the online demo).

Starting as always with packet loss:
The graph seems fine. Percentages are low because of the way packet losses are reported back from the media server. Probably some FEC / retransmissions are involved as well (this would be the case with many of the media servers out there).

Looking at the video bitrate, we see an interesting picture:
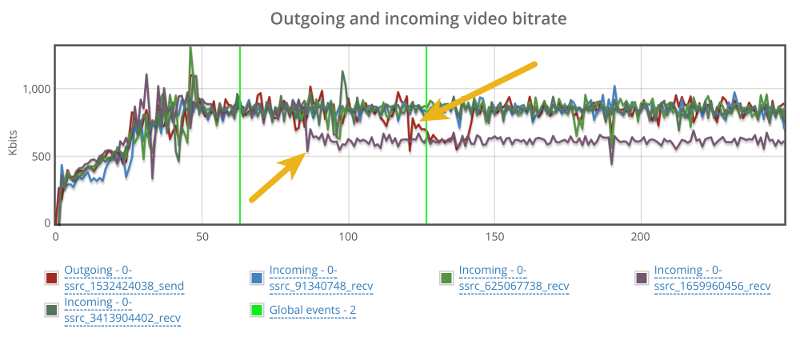
There’s a hiccup in the outgoing bitrate (the red line), but that for some reason takes place close to the end of the 60 seconds packet loss window.

There’s also a reduction in incoming bitrate for one of the video stream. It starts around 20 seconds into the packet loss zone, but it doesn’t recover even when we remove the packet losses.

Video delay is also a bit problematic:
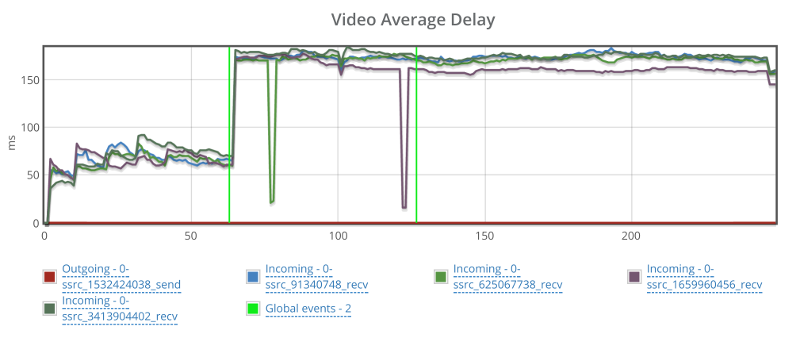
It starts off nicely, goes up when packet losses start and never recuperates.

SwitchRTC

Moving on from open source to commercial, there’s SwitchRTC.

It started by me asking for a 2mbps bitrate limit. Now, the way this was set up and without simulcast, it meant the browser is going to need to encode 2mbps and decode 4 streams of 2mbps each. This turned out to be a bit too much for the way we configure our machines (and frankly – probably too much for almost any use case you plan on deploying when it comes to assuming what your typical customer may have).

The end result of it was graphs that went all over the place – each stream and each browser tried hard to compete on resources that were limited, and it wasn’t really nice.

So we dialed back down to 1mbps bitrate limit.

As always, let’s first look at the packet loss graph:
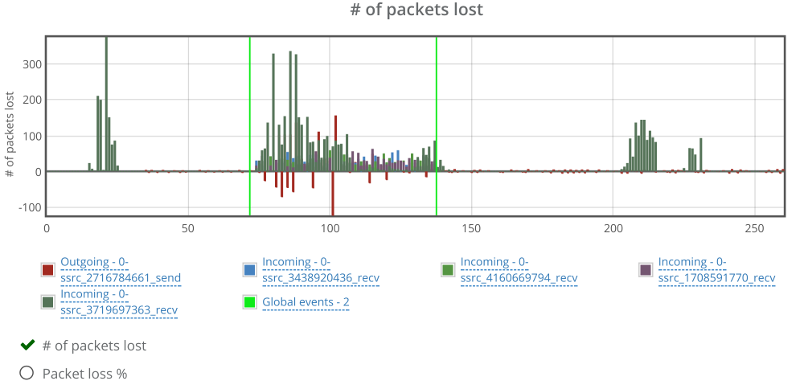
Two things here to note:

  1. One of the incoming video streams has packet losses outside the packet loss zone. Not unheard of, but a bit off the charges compared to others. I think that is due to the data centers used by SwitchRTC for this demo
  2. There’s negative packet losses on the outgoing video stream. This is due to the way SwitchRTC handles packet loss reporting (or more likely filtering packet loss reporting)

For bitrate, I took two screenshots. One for the incoming video streams and one for the outgoing video stream.
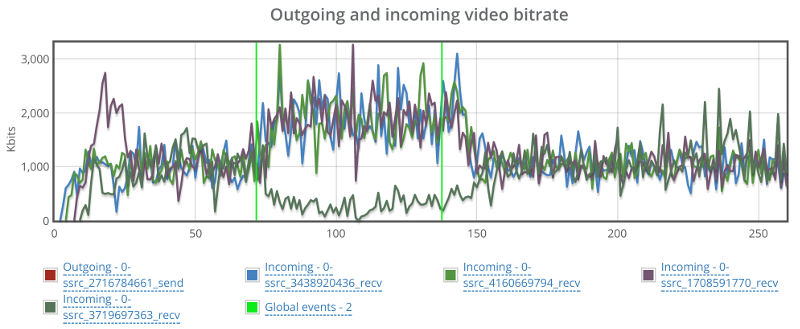
On the incoming stream we see an interesting phenomena.

When packet loss starts, bitrate picks up, most likely to overcome the packet loss. It makes sense, since we didn’t limit bitrates, so that seems like the correct strategy. Would be interesting to see what will happen if we limit bitrate as well.

The second thing, is that we have one of the incoming stream dropping down to almost zero and then picking up again. This is the same stream that shows high packet losses. I wonder what causes that.
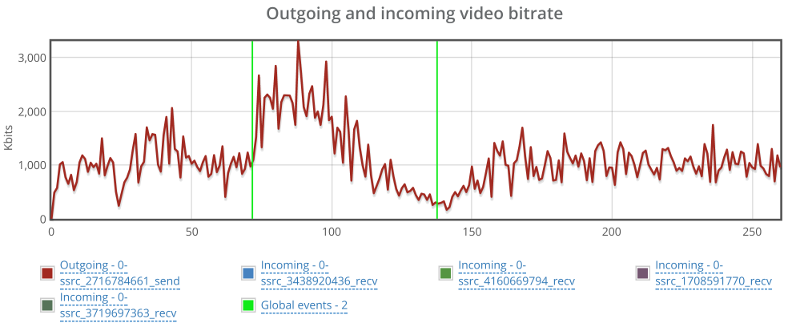
The graph above shows the outgoing video stream. This is almost textbook behavior for the outgoing video. Once it notices there’s issues, it starts increasing bitrate to compensate, and when that fails – it drops down slowly. It is similar, though not as smooth as what you see with AppRTC.

appear.in

appear.in have a beta SFU, which Philipp Hancke was kind enough to let me use.

Now, appear.in isn’t a media server or a component you can use in your own service – it is a full service, which makes this comparison a bit unfair – checking demos and comparing them to a commercial service.

But then I wanted to check this one out, as it isn’t based on any external framework – it was self developed in house at appear.in

The results are interesting.

Packet loss graph looks rather nice, if a tad low in the percentage:
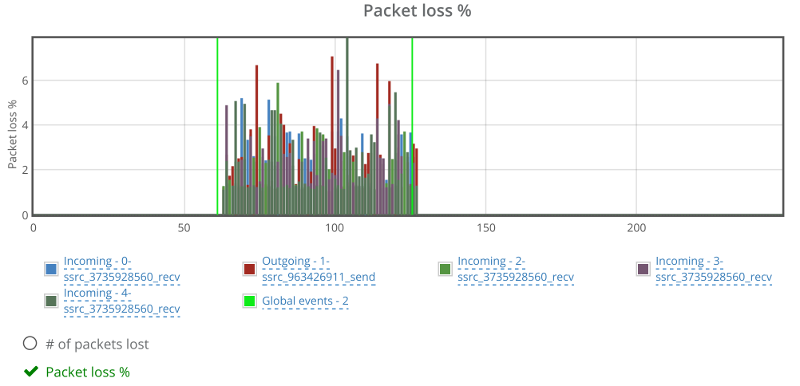
This shows how far appear.in goes in gauging and polishing the way they make use of network resources.

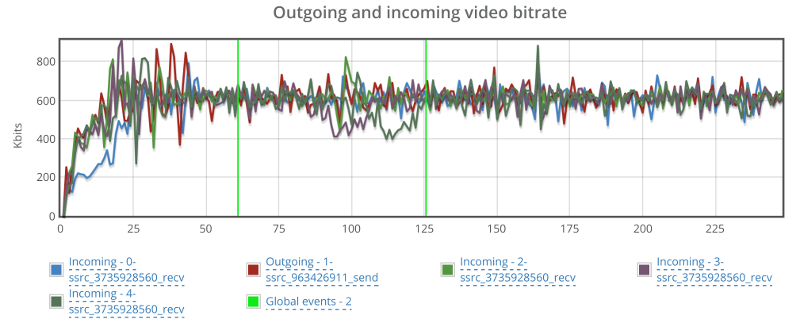
Video bitrate stays at the 600kbps vicinity – not showing any real effects from my additional packet loss:
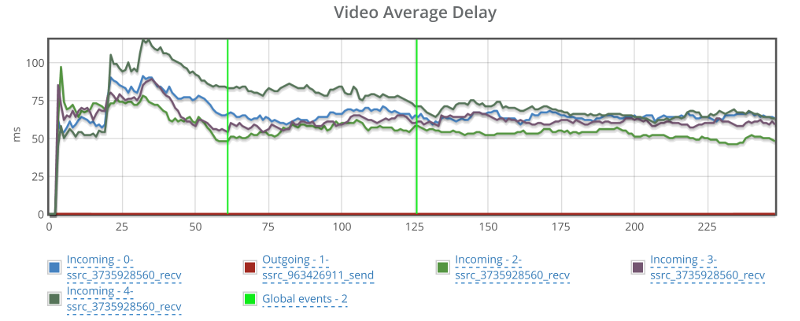
Best part though is that the video delay graph doesn’t look erratic:
I am not sure how to compare these results to the rest. I will need more time to check this out – time that I just didn’t have available for this experiment of mine. I will leave it for some future tinkering.

Summing things up

Different media servers will act differently. Especially when putting them under different network conditions.

What I wanted to show here, is how you can use testRTC to goof around with whatever setting you want. Here are a few other ideas:

  1. Drop the network down to 0 bitrate. Wait a bit. Put it back up. Did media return? How quickly did it come up again?
  2. Limit bitrates to different levels. Check if your media server adapts things like resolutions and other interesting parameters to fit the needs
  3. Go down to 50 or 100 kbps. Does video persist or is the media server shutting it down in favor of audio?
  4. Limit bitrate and add a bit of packet loss at the same time (this would be closest to real life). See what happens then – how will the media server behave?
  5. Do the above while adding some load on the server. Does it start fidgeting or is it handling this nicely?

A few things to remember here:

This isn’t an apples to apples comparison

I haven’t taken each and every media server and installed it on my own on the same server configuration. I just used the online demos each of these vendors had. At times, asking for assistance and a bit of configuration from the vendor.

What was different:

  • The server(s) the media server was installed on
  • The configuration of the server, especially what max bitrate it allows

What was similar:

  • I tried disabling simulcast in all servers. Assume that’s a bad thing to do, but I wanted a level playing field on that front
  • The browser used. It was the same for all tests. This includes their version, the machine they were installed on, the network they used, their geographical location – everything
  • The scenario itself. I essentially executed the same scenario over and over again in front of different media servers

Where do we go from here?

Media servers are hard to develop. They are hard to tweak and optimize. And they are hard when it comes to making sizing decisions with them.

They are also pretty good. Most of the ones shown here are running in production services with live customers.

When you go tomorrow to pick the media server for your own project. Or when you want to plan how to size capacities per machine. Or if you want to check your media server in real life scenarios – we’ve got your back.

Check us out. I am sure we can be of help to you.

1

How Different WebRTC Multiparty Video Conferencing Technologies Look Like on the Wire

MCU, SFU, Mesh – what do they really mean? We decided to take all these techniques to a spin to see what goes on on the network.
To that end, we used some simple test scripts in testRTC and handpicked a service that uses each of these techniques:

We used 4 browsers for each test. All running Chrome 48 (the current stable version). All from the same data center. All using the same 720p video stream as their camera source.

While the test lengths varied across tests, we will be interested to see the average bitrate expenditure of each to understand the differences.

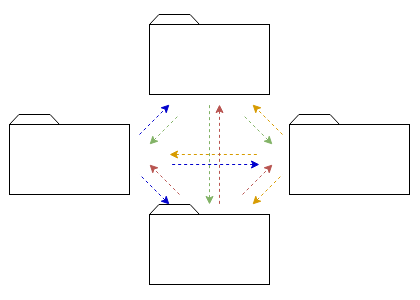
Mesh

appear.in runs a mesh call. It means that each user will need to send its media to all other users in the session – as well as receive all the media streams from them.

This is how it looks like:

mesh video architecture

I’ve opened up an ad-hoc room there and got 4 of our browser agents into it. Waited about a minute and collected the results:

appear.in mesh video

Nothing much to see here. Incoming and outgoing video across the whole test is rather similar, if somewhat high.

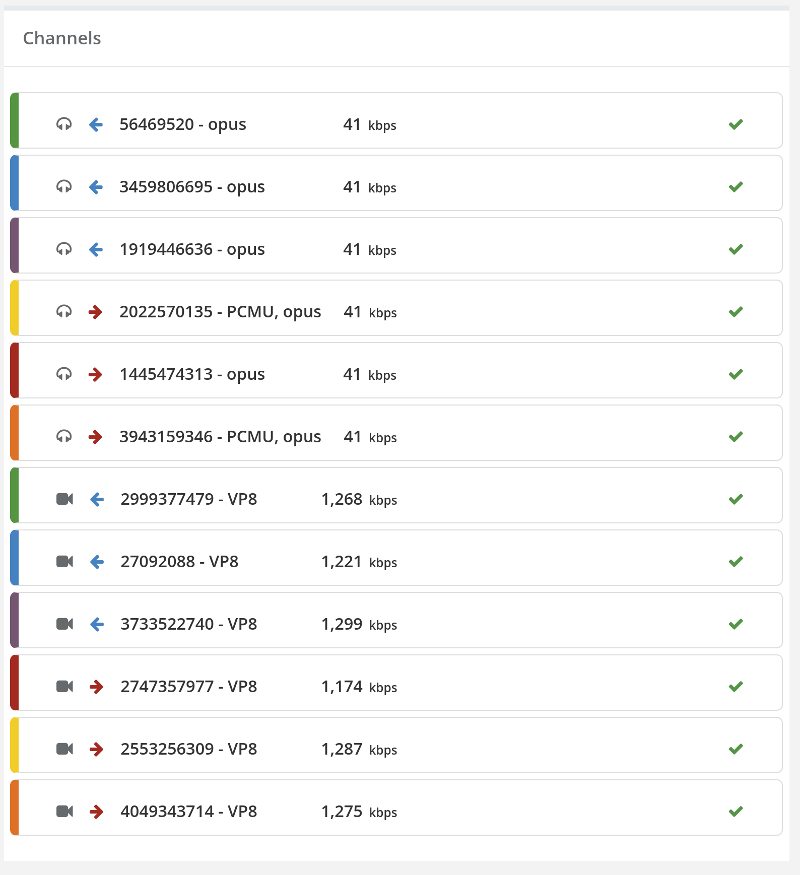
Looking at one of the browser’s media channels tells the story:

appear.in mesh video

This agent has 3 outgoing and 3 incoming voice and video channels.

Average bitrate on the video channel is around 1.2 mbps, which means our agent runs about 3.6 megabytes uplink and downlink. Not trivial.

SFU

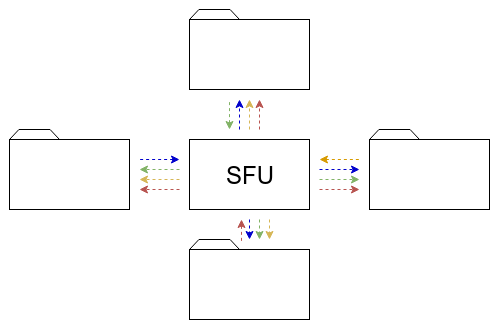
Talky uses Jitsi for its SFU implementation. It means that it doesn’t process video but rather routes it to everyone who needs it. Each browser sends its media to the SFU, which then forwards that media to all other participants.

This is how it looks like:

sfu video architecture

I took 4 browsers in testRTC and pointed them at a single Talky session. Here’s what the report showed:

Talky SFU video

The main thing to not there is that in total, the browsers we used processed a lot more incoming media than outgoing one (at a rate of 3 to 1). This shouldn’t surprise us. Look at how one of these browsers reports its media channels:

Talky SFU video

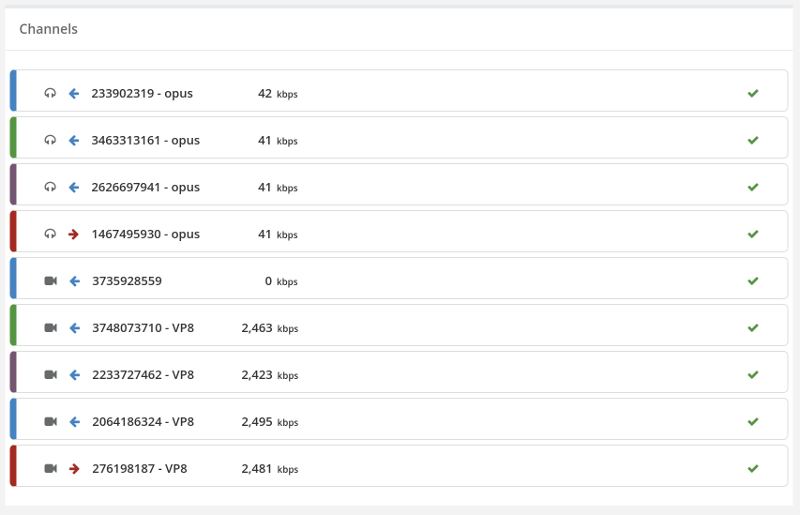
1 outgoing audio and video channel and then 3 incoming audio and video channels. There’s another empty video channel – Talky is probably using that for incoming screen sharing.

Note how in this case the same machines with the same network performance did a lot better. The outgoing video channel gets to almost 2.5 mbps bitrate. Almost twice as much as the mesh was capable of using. To make it clear – mesh doesn’t scale well.

MCU

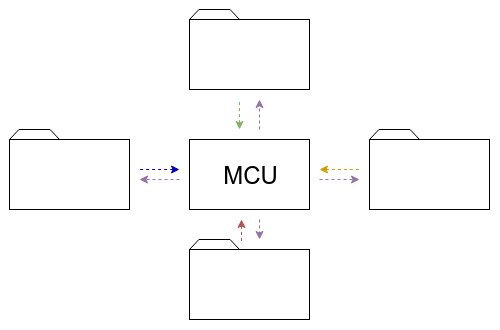
For an MCU I picked BlueJeans service. We’ve been playing with it a bit on a demo account so I took the time to take a quick capture of a session. Being architectured around an MCU means that each browser sends a single video stream. The MCU takes all these video streams and composes them into a single video stream that is then sent to each participant separately.

mcu video architecture

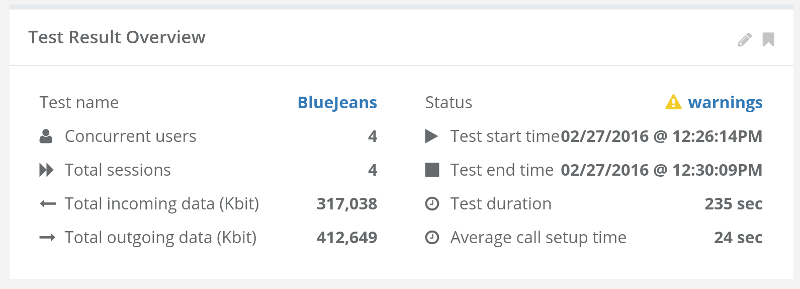
As with the other two experiments, I used 4 browsers with this MCU, receiving this report highlights:

BlueJeans MCU video

Total kilobits here is rather similar. It seems that in total, browsers received less than they sent out.

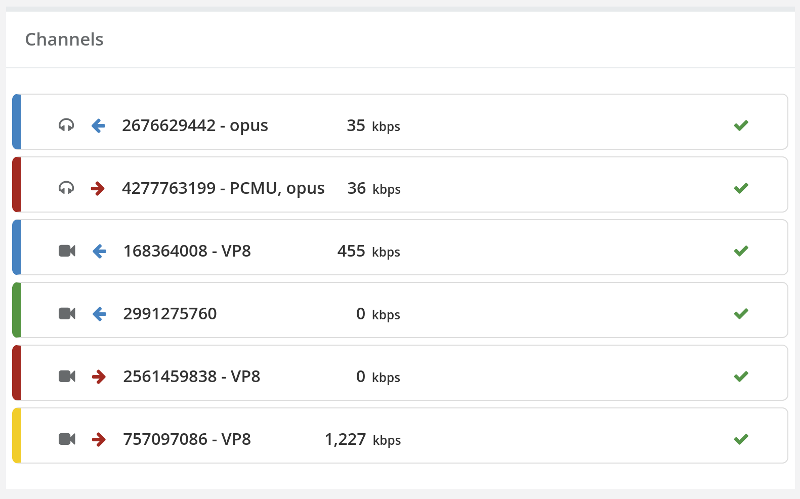
Drilling down into a single browser report, we see the following channels:

BlueJeans MCU video

Single incoming and a single outgoing audio and video channels. We have an additional incoming/outgoing video channel with no data on it – probably saved for screen sharing. While similar to how Talky does it, BlueJeans opens up an extra outgoing channel by default while Talky doesn’t.

Outgoing bitrate averages at 1.2 mbps – a lot lower than the 2.5 mbps in Talky. I assume that’s because BlueJeans limited the bitrate from the browser, which actually makes a lot of sense for 720p video stream. The incoming video is even lower at 455 kbps bitrate on average.

This didn’t make sense to me, so I dug a bit deeper into some of our video charts and found this:

BlueJeans MCU video

So BlueJeans successfully managers to get its outgoing video from the MCU towards the browser up to the same 1.2 mbps bitrate. Thinking about it, I shouldn’t be surprised. Talky and appear.in are ad-hoc services, while BlueJeans is a full service with business logic in it – getting all browsers into the session takes more time with it, especially with how we’ve written the script for it. We have a full minute here from the browser showing its local video until it really “connects” to the conference.

Another interesting tidbit is that Chrome gets its bitrate to 1.2 quite fast – something Google took care of in 2015. BlueJeans takes a slower route towards that 1.2mbps taking about half a minute to get there.

So What?

Video comes in different shapes and sizes.

WebRTC reduces a lot of the decisions we had to make and takes care of most browser related media issues, but it is quite flexible – different services use it differently to get to the same use case – here multiparty video chat.

If you are looking to understand your WebRTC service better and at the same time automate your testing and monitoring – try out testRTC.