All Posts by Tsahi Levent-Levi

3 testRTC Update: May 2016

Yesterday, we released our latest update to testRTC.

This new version started with the intent to “just replace backend tables” and grew from there due to the usual feature creep. Wanting to serve the needs of our customers does that to us.

Anyway, here’s what you should expect from this updated version:

  • Improved backend tables. We’ve rewritten our table’s code
    • This makes them load faster when they are full – especially the monitor run history ones which tend to fill up fast and then load slow
    • We used the time to add pagination, filters and search capabilities
  • Report results improvements
    • The results tab for specific agents are now easier to navigate
    • Warnings and errors are collected, aggregated and can be filtered based on their type
    • All collected file can now be viewed or downloaded in the same manner
  • Automatic screenshot on failure
    • Whenever a test fails, we try to take a screenshot of that last moment
    • This can be very useful for debugging and post mortem analysis of test results
  • Test import/export
    • We’ve added the ability to import and export tests
    • This got us into serializing our tests’ information as JSON objects – a characteristics we will be making use of in future versions
  • New webhook at the end of a test/monitor run. You can now call an external system with the result of a test or monitor
    • We’ve seen people use it to push our results into Splunk
    • They can generally be used as a good programmable alerting mechanism on top of the monitoring service
    • More on how to use the new webhooks
  • APIs
    • We’ve added RESTful APIs to our service, so you can now executre and retrieve test results programmatically
    • This is quite useful for continuous integration scenarios
    • Our API documentation is available online
  • More expectations on channels
    • We’ve added the ability to set expectations on channels also based on the total data, number of packets and round trip
    • Check out rtcSetTestExpectation for more information

We are also introducing audio MOS in limited beta – contact us if you’d like to try it out.

Use our Monitor During Development to Flush Out Your Nastiest WebRTC Bugs

Things break. Unexpectedly. All the time.

One thing we noticed recently is the a customer or two of ours decided to use our monitoring service in their staging versions or during development – and not only on their production system. So I wanted to share this technique here.

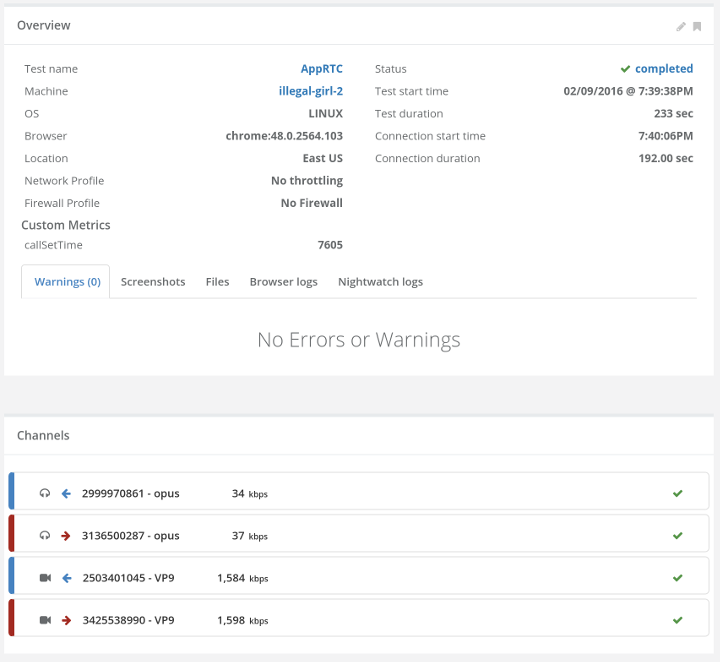
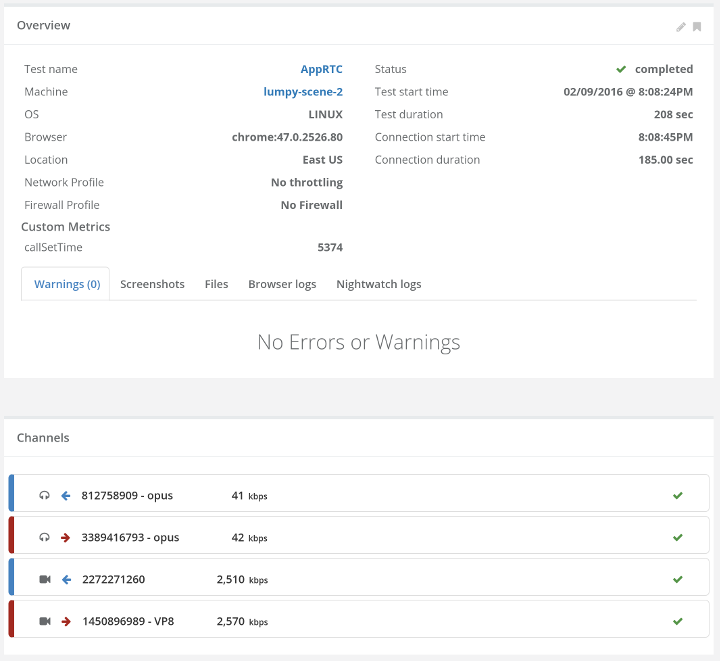
First off, let me explain how the testRTC monitoring service works.

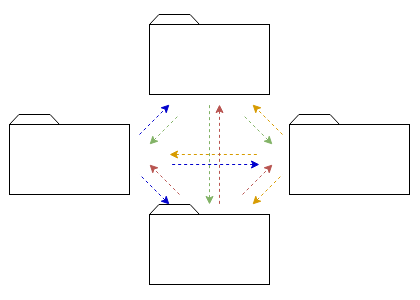
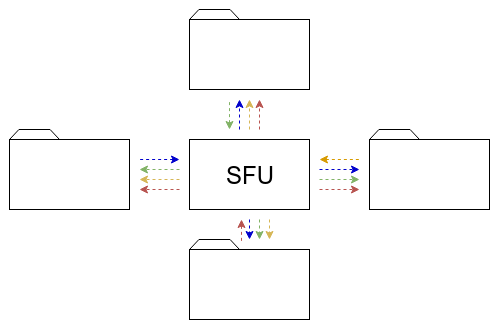
In testRTC you write scripts that instruct the browser what to do. This means going to a URL of your service, maybe clicking a few buttons, implementing a form, waiting to synchronize with other browsers – whatever is necessary to get to that coveted media interaction. You can then configure the script for  number of browsers, browser versions, locations, firewall configurations and network conditions. And then you can run the test whenever you want.

The monitoring part means taking a test script in testRTC and stating that this is an active monitor. You then indicate what frequency you wish to use (every hour, 15 minutes, etc.) and indicate any expected results and thresholds. The test will the run in the intervals specified and alert you if anything fails or the thresholds are exceeded.

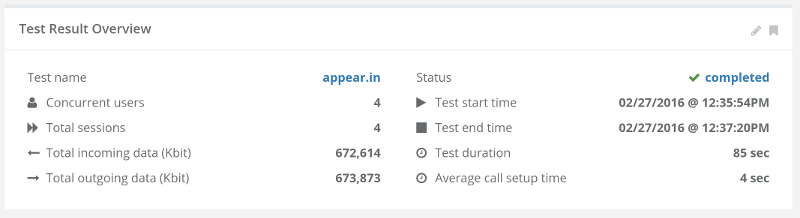
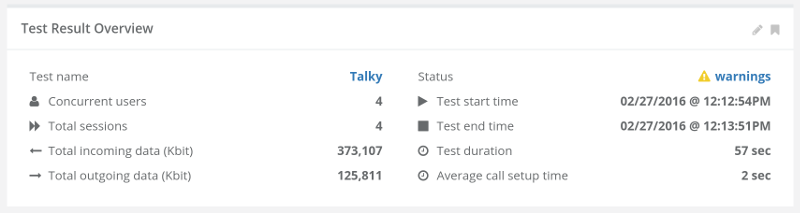
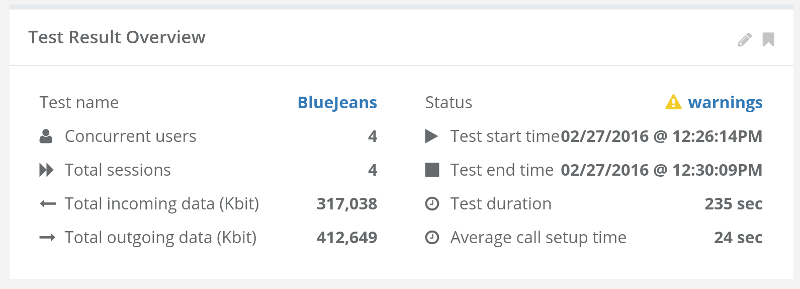
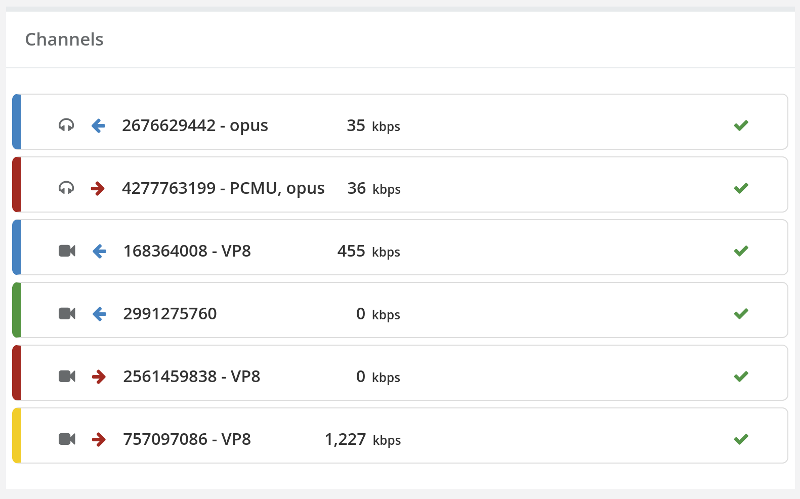
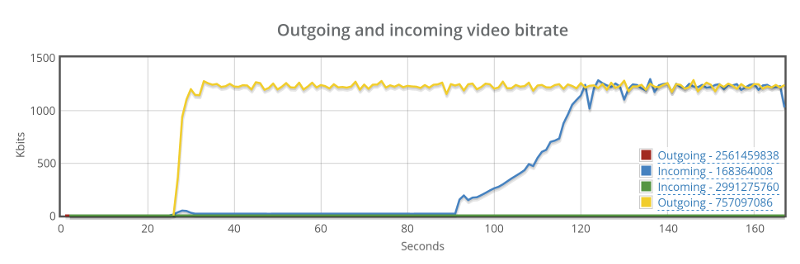
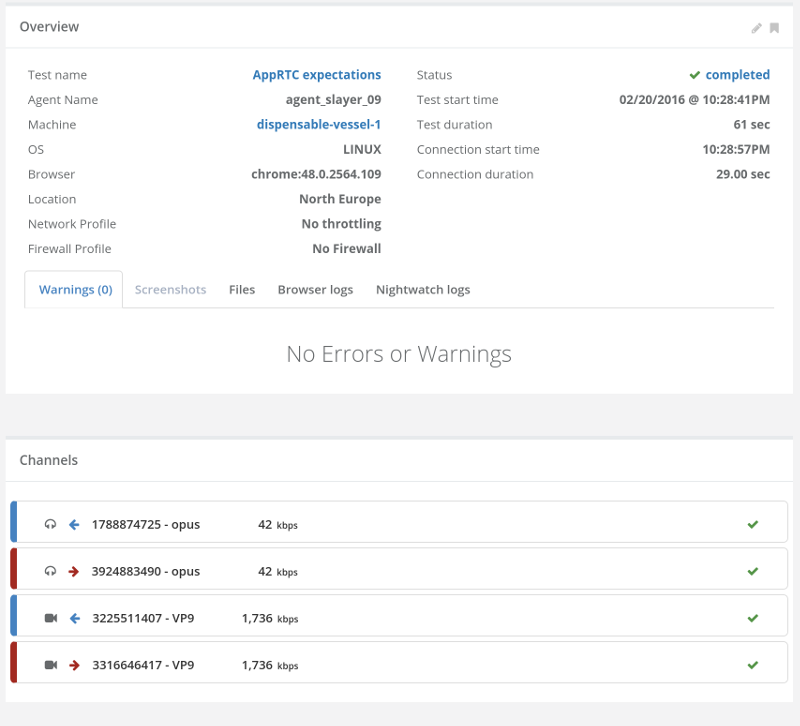
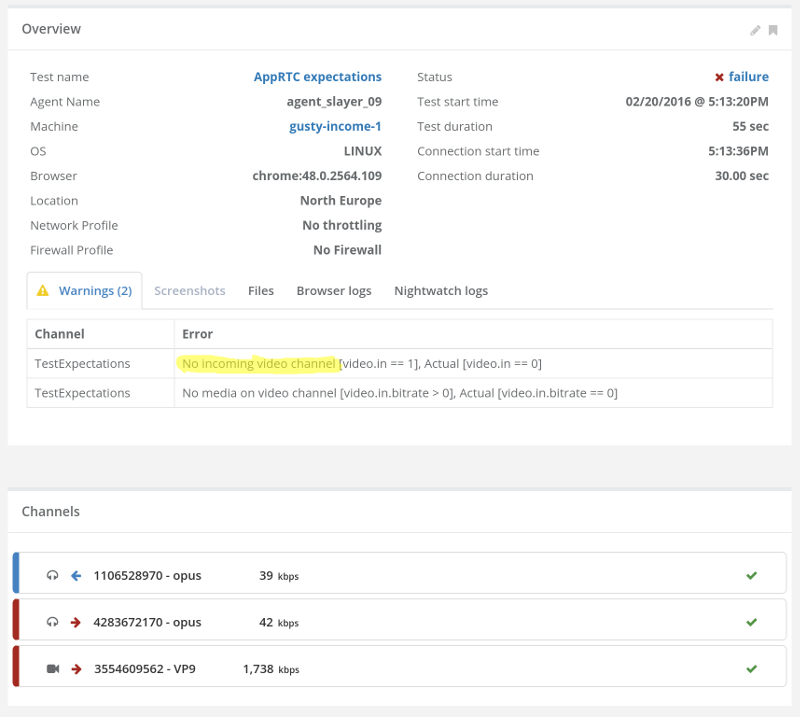
Here’s one of the ways in which we test our own monitor – by running it against AppRTC:

Monitoring AppRTC using testRTC

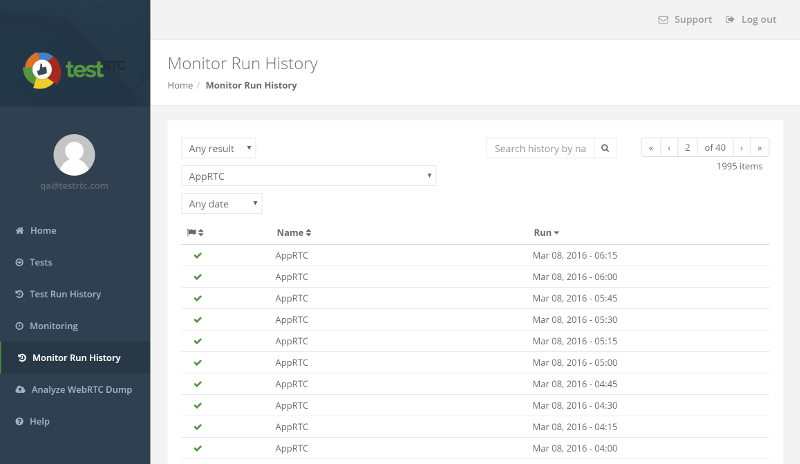
What you see above is the run history – the archive. It shows past executions of the AppRTC monitor we configured and their result. You should already know how fond I am of using AppRTC as a baseline.

We’ve added this service as a way for customers to be able to monitor their production service – to make sure their system is up and running properly – as opposed to just knowing the CPU of their server is not being overworked. What we found out is that some decided to use it on their development platform and not only the production system.

Why?

Because it catches nasty bugs. Especially those that happen once in a lifetime. Or those that need the system to be working for some time before things start to break. This is quite powerful when the service being tested isn’t pure voice or video calling, but has additional moving parts. Things such as directory service, databases, integration with third party services or some extra business logic.

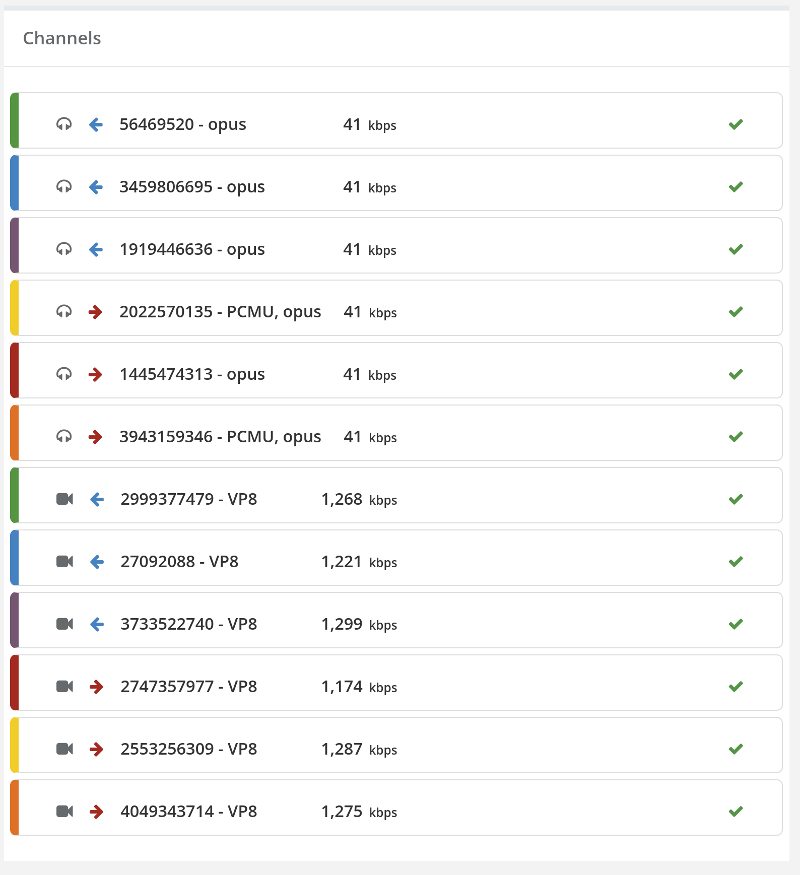
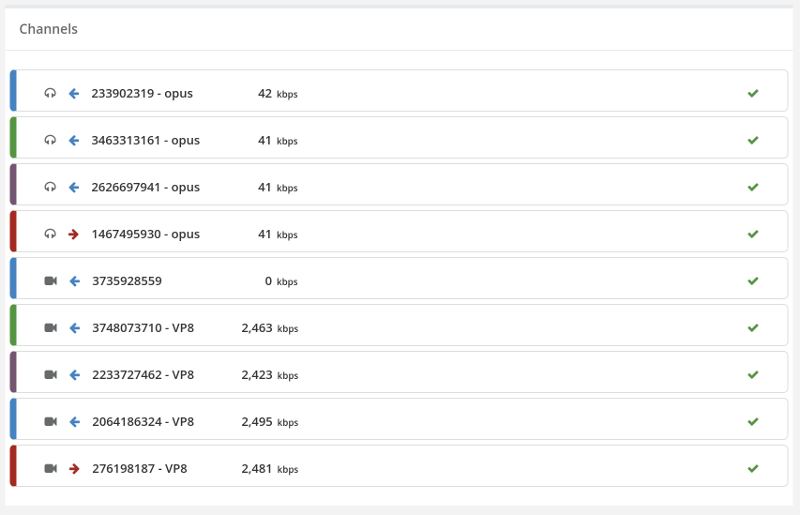
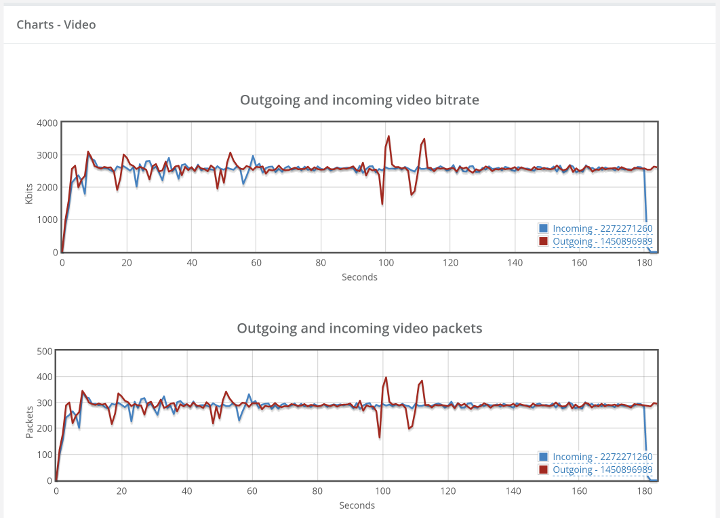
The neat thing about it all? When things do break and the monitor catches that, you get alerted – but more than that, you get the whole shebang of debugging information:

  • Our reports and visualization
  • The webrtc-internals dump file
  • The console log
  • Screenshots taken throughout the session
  • In our next release, we’re adding some more tools such as an automatic screenshot taken at the point of failure

Those long endurance testing QA people love doing on systems for stretches of days or weeks? You can now set it up to run on your own systems, and get the most out of it when it comes to collection of post mortem logs and data that will assist you to analyze, debug and fix the problem.

Come check us out – you won’t regret it.

Meet us at WebRTC Global Summit

Next week, I will be presenting at WebRTC Global Summit in London.

WebRTC Global Summit is one of the main European events that are focused around WebRTC.

This time around, the event is split into three separate tracks:

  1. Developer track, taking place on April 11, where I will be speaking about video codecs in WebRTC and chairing the day
  2. Telecom track, taking place in parallel to the Developer track
  3. Enterprise track, taking place on April 12, where I will be speaking about testing challenges of WebRTC in the enterprise

WebRTC brings with it new challenges when it comes to testing and monitoring, and this will be my main focus for the session on the Enterprise track. To give a few examples of where these challenges are:

  • You are now reliant on the browsers and how they implement and update their support for WebRTC
  • What is it that you test and monitor? I’ve seen services fail because a connection to a directory service was flaky or a NAT wasn’t configured properly
  • How do you simulate different network conditions for the browsers you use during testing?

These types of challenges, and how to deal with them are things I will be raising during the session.

On another topic, until the recording from the recent Kranky Geek India event becomes available, here’s the presentation I’ve given there:

There’s a solid agenda, and the event is free to attend for telcos, enterprises and developers. If you are in London, I highly recommend you register and come to the event. I’ll be happy to catch a chat with you on anything WebRTC related.


See you at Kranky Geek India

This week, I am heading to Kranky Geek India.

The event takes place on the 19th of March in Bengaluru with a great cadre of speakers – both local to India and those who are traveling especially for this (like me). As an organizer of this event, it is important for me that it turns out properly.

In last year’s event I didn’t really speak. Since I like hearing my voice in a room full of people, I couldn’t miss the opportunity to speak this time. Testing being something I focus on lately (obviously), meant that “Quality Assurance of WebRTC Services” was the topic of choice for me.

So what will I share in this session?

How do you go about automating your WebRTC testbed?

Instead of talking about how great testRTC is, and what you can do with it – I’ll give some tips to those who wish to develop their own WebRTC automation infrastructure. I’ll try to cover as much ground as the 20 minutes allotted to the speakers at Kranky Geek.

If you are around – make sure to come and say hi!

2

Why we are Using Real Browsers to Test WebRTC Services?

The most important decision we made was one that took place before testRTC became a company. It was the decision to use a web browser as the agent/probe for our service instead of building something on top of WebRTC directly or god forbid GStreamer.

Here are a few things we can do because we use real browsers in WebRTC testing:

#1 – Time to Market

Chrome just released version 49.

How long will it take for you to test its behavior against your WebRTC service if you are simulating traffic instead of using this browser directly?

For us, the moment a browser gets released is almost the moment we can enable it for our customers.

To top it off, we enable access to our customers to the upcoming  browser versions as well – beta and unstable. This helps those who need to test their service check and get some confidence in their service when running them against future versions of browsers.

Even large players in the WebRTC industry can be hit by browser updates – TokBox did some time ago, so being able to test and validate such issues earlier on is imperative.

#2 – Pace of Change

VP9? H.264? ORTC APIs? Deprecation of previous APIs? Replacement of the echo canceler?  Addition of local recording APIs? Media forwarding?

Every day in WebRTC brings with it yet another change.

Browsers get updated in 6-8 weeks cycles, and the browser vendors aren’t shy about removing features or adding new ones.

Maintaining such short release cycles is hellishly tough. For an established vendors (testing or otherwise), it is close to impossible – they are used to 6-12 months release cycles at best. For startups it is just too much of a hassle to run at these speeds – what you are trying to achieve at this point is leverage others and focus on the things you need to do.

So if the browser is there, it gets frequently updated, and it is how the end users end up running the service, why can’t we use it ourselves to leverage both automated and manual testing?

It was stupidly easy for me to test VP9 with testRTC even before it was officially released in the browser. All I had to do was pick the unstable version of the browser testRTC supports and… run the test script we already had.

The same is true for all other changes browsers make in WebRTC or elsewhere – they become available to us ad our customers immediately. And in most cases, with no development at all on our part.

#3 – Closest to Reality

You decided to use someone who simulates traffic and follows the WebRTC spec for your testing.

Great.

But does it act like a browser?

Chrome and Firefox act different through the API calls and look different on the wire. Hell – the same browser in two different versions acts differently.

Then why the hell use a third party who read the WebRTC spec and interpreted it slightly different than the browser used at the end of the day? Count the days. In each passing day, that third party is probably getting farther away from the browsers your customers are using (until someone takes the time and invests in updating it).

#4 – Signaling Protocols

When we started this adventure we are on with testRTC, we needed to decide what signaling to put on top of WebRTC.

Should it be SIP over WebSocket? Covering the traditional VoIP market.

Maybe we should to for XMPP. Over BOSH. Or Comet. Or WebSocket. Or not at all.

Should we add an API on top that the customer integrates with in order to simulate the traffic and connect to his own signaling?

All these alternatives had serious limitations:

  • Picking a specific signaling protocol would have limited our market drastically
  • Introducing an integration API for any signaling meant longer customer acquisition cycles and reducing our target market (yet again)

A browser on the other hand… that meant that whatever the customer decided to do – we immediately support. The browser is going to drive the interaction anyway. Which is why we ended up using browsers as the main focus of our WebRTC testing and monitoring service.

#5- Functional Testing and Business Processes

WebRTC isn’t tested in vacuum. When you used to use VoIP – things were relatively easy. You have the phone system. It is a service. You know what it does and how it works. You can test it and any of its devices and building blocks – it is all standardized anyway.

WebRTC isn’t like that. It made VoIP into a feature. You have a dating site. In that site people interact in multiple ways. They may also be doing voice and video calls. But how they reach out to each other, and what business processes there are along the way – all these aren’t related to VoIP at all.

Having a browser meant we can add these types of tests to our service. And we have customers who check the logic of their site and backend while also checking the media quality and the WebRTC traffic. It means there’s more testing you can do and more functionality of your own service you can cover with a single tool.

Thinking of Testing Your WebRTC Service?

Make sure a considerable part of the testing you do happens with the help of browsers.

Simulators and traffic generators are nice, but they just don’t cut it for this tech.

1

How Different WebRTC Multiparty Video Conferencing Technologies Look Like on the Wire

MCU, SFU, Mesh – what do they really mean? We decided to take all these techniques to a spin to see what goes on on the network.

To that end, we used some simple test scripts in testRTC and handpicked a service that uses each of these techniques:

We used 4 browsers for each test. All running Chrome 48 (the current stable version). All from the same data center. All using the same 720p video stream as their camera source.

While the test lengths varied across tests, we will be interested to see the average bitrate expenditure of each to understand the differences.

Mesh

appear.in runs a mesh call. It means that each user will need to send its media to all other users in the session – as well as receive all the media streams from them.

This is how it looks like:

mesh video architecture

I’ve opened up an ad-hoc room there and got 4 of our browser agents into it. Waited about a minute and collected the results:

appear.in mesh video

Nothing much to see here. Incoming and outgoing video across the whole test is rather similar, if somewhat high.

Looking at one of the browser’s media channels tells the story:

appear.in mesh video

This agent has 3 outgoing and 3 incoming voice and video channels.

Average bitrate on the video channel is around 1.2 mbps, which means our agent runs about 3.6 megabytes uplink and downlink. Not trivial.

SFU

Talky uses Jitsi for its SFU implementation. It means that it doesn’t process video but rather routes it to everyone who needs it. Each browser sends its media to the SFU, which then forwards that media to all other participants.

This is how it looks like:

sfu video architecture

I took 4 browsers in testRTC and pointed them at a single Talky session. Here’s what the report showed:

Talky SFU video

The main thing to not there is that in total, the browsers we used processed a lot more incoming media than outgoing one (at a rate of 3 to 1). This shouldn’t surprise us. Look at how one of these browsers reports its media channels:

Talky SFU video

1 outgoing audio and video channel and then 3 incoming audio and video channels. There’s another empty video channel – Talky is probably using that for incoming screen sharing.

Note how in this case the same machines with the same network performance did a lot better. The outgoing video channel gets to almost 2.5 mbps bitrate. Almost twice as much as the mesh was capable of using. To make it clear – mesh doesn’t scale well.

MCU

For an MCU I picked BlueJeans service. We’ve been playing with it a bit on a demo account so I took the time to take a quick capture of a session. Being architectured around an MCU means that each browser sends a single video stream. The MCU takes all these video streams and composes them into a single video stream that is then sent to each participant separately.

mcu video architecture

As with the other two experiments, I used 4 browsers with this MCU, receiving this report highlights:

BlueJeans MCU video

Total kilobits here is rather similar. It seems that in total, browsers received less than they sent out.

Drilling down into a single browser report, we see the following channels:

BlueJeans MCU video

Single incoming and a single outgoing audio and video channels. We have an additional incoming/outgoing video channel with no data on it – probably saved for screen sharing. While similar to how Talky does it, BlueJeans opens up an extra outgoing channel by default while Talky doesn’t.

Outgoing bitrate averages at 1.2 mbps – a lot lower than the 2.5 mbps in Talky. I assume that’s because BlueJeans limited the bitrate from the browser, which actually makes a lot of sense for 720p video stream. The incoming video is even lower at 455 kbps bitrate on average.

This didn’t make sense to me, so I dug a bit deeper into some of our video charts and found this:

BlueJeans MCU video

So BlueJeans successfully managers to get its outgoing video from the MCU towards the browser up to the same 1.2 mbps bitrate. Thinking about it, I shouldn’t be surprised. Talky and appear.in are ad-hoc services, while BlueJeans is a full service with business logic in it – getting all browsers into the session takes more time with it, especially with how we’ve written the script for it. We have a full minute here from the browser showing its local video until it really “connects” to the conference.

Another interesting tidbit is that Chrome gets its bitrate to 1.2 quite fast – something Google took care of in 2015. BlueJeans takes a slower route towards that 1.2mbps taking about half a minute to get there.

So What?

Video comes in different shapes and sizes.

WebRTC reduces a lot of the decisions we had to make and takes care of most browser related media issues, but it is quite flexible – different services use it differently to get to the same use case – here multiparty video chat.

If you are looking to understand your WebRTC service better and at the same time automate your testing and monitoring – try out testRTC.

How to make sure you have WebRTC incoming audio using testRTC

I hear this one far too many times:

How can I make sure there’s incoming audio? We had this issue a few weeks/months ago, where sessions got connected in our WebRTC service, but there was no incoming audio. Can testRTC alert me of such a situation?

Looking for your WebRTC inocming audio? testRTC can do just that for you.

There are two things that our customers are looking for in such cases:

  1. Making sure that the exact channels they expected to open in the call actually opened (here the idea is no more and no less)
  2. Validating there’s media being sent on these channels at all

Some customers even have more specific expectations – in the domain of the packet loss or latency of these channels.

This is one of the reasons why we’ve added the test expectations capability to testRTC. What this means is that you can indicate inside your test script what you expect to happen – with a focus on media channels and media – and if these expectations aren’t met, the test will either fail or just have an added warning on it.

Here’s how it works. The code below is a simple test script for Google’s AppRTC that I’ve written for the occasion:

// *** My expectations ***
client
    .rtcSetTestExpectation("audio.in == 1", "No incoming audio channel", "error")
    .rtcSetTestExpectation("video.in == 1", "No incoming video channel", "error")
    .rtcSetTestExpectation("audio.in.bitrate > 0", "No media on audio channel", "error")
    .rtcSetTestExpectation("video.in.bitrate > 0", "No media on video channel", "error");

// *** My actual test script
client
    .url("https://appr.tc/r/testRTCexpectations-5")
    .waitForElementVisible('body', 5000)
    .pause(500)
    .click('#confirm-join-button')

    .pause(30000);

It is nothing fancy. It just gets the user into a predetermined URL (testRTCexpectations) and gives it 30 seconds to run.

We run this on two agents (=two browsers) and you get a call. That call should have two incoming and two channels (one video and one voice in each direction).

To make sure this really happens, I added those first four lines with rtcSetTestExpectation() – they indicate that I want to fail the test if I don’t get these incoming channels with media on them.

Here’s how a successful test will look like:

WebRTC test expectations

Perfect scoring. No warnings or errors. All channels are listeed nicely in the test results.

And here what happened when I ran this test with only a single browser of testRTC – and join the same room with my own laptop with its camera disabled:

WebRTC test expectations

As you can see, the test failed and the reasons given were that there was no incoming video channel (or media on it).

You can see from the channels list at the bottom that there is no incoming channel, along with all the other channels and the information about them.

What else can I do?

  • Use it on outgoing channels
  • Check other parameters such as packet loss
  • Place expectations on custom metrics and timers you use in the test

You can learn more about this capability in our knowledge base on expectations.

2

The day Talky and Jitsi failed – and why end-to-end monitoring is critical

It was a bad day for me. 14 January 2016.

I had a demo to show to a customer of testRTC. Up until that point, the demos we’ve shown potential customers were focused on Jitsi or Talky (depending on who did the demo).

There were a couple of reasons for picking these services for our demos:

  1. They are freely available, so using them required no approval from anyone
  2. They require no login to use, so the script on top of them was a simple one to explain and showcase
  3. They support video, making them visual – a good thing in a demo
  4. They support more than two participants, which shows how we can scale nicely
  5. In the case of Jitsi, you can visually see if the session is relayed or not – making it easy to show how our network configuration affects WebRTC media routing

We used to use them a lot. For me, they were always stable.

Until 14th of January last month, when both mysteriously failed on me. The failure was a subtle one. The site works. You can join sessions. You can see your camera capture. It tells you it is waiting for other participants to join. But it does that also when someone joins – that other participant? He sees the same message exactly.

You have two or more people in the same session, all waiting for each other, when they are already all effectively “in the meeting”.

Our scheduled demos for the day failed. We couldn’t show a decent thing to customers – relying on a third party was a small mistake – we switch to show demo on other services – but it cost us time in these meetings. Since then, we’ve gone AppRTC for our baseline.

I don’t know why Jitsi and Talky failed on the same day. They both make use of the Jitsi Videobridge, but I don’t believe it was related to the videobridge or even to the same issue – just a matter of coincidence.

While these things happen to all of us, we need to strive for continuous improvement – both in the time it takes us to find an issue as well as fixing it.

5

Will your WebRTC service cope with VP9?

Chrome 48 has been out for a week now with some much needed features – some of them we plan on using in testRTC ourselves.

One thing that got added is official VP9 support. Sam Dutton, developer advocate @Google for everything WebRTC (and then some), wrote a useful piece on how to use VP9 with Chrome 48.

A few things interesting here:

  1. Chrome 48 now supports both VP8 and VP9 video codecs
  2. While VP9 is the superior codec, it is NOT the preferred codec by default

That second thing, of VP9 not being the preferred codec, means it won’t be used unless you explicitly request it. For now, you probably don’t have to do anything about it, but how many Chrome versions will pass until Google flips this preference?

When should you start looking at VP9?

  1. If your service runs peer-to-peer and uses no backend media processing, then you should care TODAY. Change that preference in your code and try it out. That’s free media quality you’re getting here
  2. If your service routes media through a backend server but doesn’t process it any further, then you should try it out and see how well it works. With a bit of fine tuning you should be good to go
  3. If your service needs to encode or decode video in the backend, then you’ve got work to do, and you should have started a couple of months ago to make this transition

In all cases, now would be a good time to start if you haven’t already.

Let’s take a look at AppRTC and VP9

You may have noticed I am a fan of using AppRTC for a baseline, so let’s look at it for VP9 as well. Google were kind enough to add support for VP9 to AppRTC, which means that our own baseline test for our testRTC users already supports VP9.

I took our AppRTC testRTC script for a spin. Decided to use a 720p resolution for the camera output and placed two users on it to see what happens. Here are screenshots of the results:

Chrome 48 AppRTC with VP9

What you see above is a drill down of one of the two test agents running in this test. The call was set to around 3 minutes and the interesting part here is in the bottom – the fact that we’re using VP9 for this call. You can also see that the average bitrate for the video channel is around 1.6Mbps. More about that later.

We could have done this when Chrome 48 was beta, but we didn’t have this blog then, so there wasn’t any point 🙂

When you look at the graphs for the video channels, this is what you see:

Chrome 48 AppRTC with VP9

From the above charts, there are 3 things I want to mention:

  1. It takes Chrome around 30 seconds to get to the average 1.6Mbps bitrate with VP9
  2. It is rather flaky, going up and down in bitrate quite a lot
  3. This also affects the audio bitrate (not seen here, but in another graph in the report that I didn’t put here)

How does this compare to VP8?

I took the same test and used Chrome 47 for it via testRTC. Here’s what I got:

Chrome 47 AppRTC with VP8

The main difference here from Chrome 48’s VP9 implementation? Average bitrate is around 2.5Mbps – around 0.9Mbps more (that’s 36% difference).

What’s telling though is the other part of the report:

201602-Chrome-47-VP8-2

Notice the differences?

  1. It takes Chrome 47 10 seconds or less to get VP8 to its 2.5Mbps average bit rate. A third the time that Chrome 48 needs for VP9. I didn’t further investigate if this is an issue of how Chrome works or the specific video codec implementation. Worth taking the time to look at though
  2. Chrome 47 is as stable as a rock once it reaches the available bitrate (or its limit)
  3. Audio (again, no screenshot) is just as predictable and straight in this case

How are you getting ready for VP9?

VP9 is now officially available in Chrome. There’s a lot way to go still to get it to the level of stability and network performance of VP8. That said, there are those that will enjoy this new feature immediately, so why wait?

We’re here for you. testRTC can help you test and analyze your WebRTC service with VP9 – contact us to learn more.

8 How to create a .Y4M video file that Chrome can use?

If you’ve ever tried to replace the camera feed for Chrome with a media file for the purpose of testing WebRTC, you might have noticed that it isn’t the most easy process of all.

Even if you got to the point of having a .Y4M file (the format used by Chrome) and finding which command line flags to run Chrome with – there is no guarantee for this to work.

Why? Chrome likes its .Y4M file in a very very specific way. One which FFmpeg fails to support.

We’ve recently refreshed the media files we use ourselves in testRTC – making them a bit more relevant in terms of content type and containing media that can hold high bitrates nicely. Since we have our own scars from this process, we wanted to share it here with you – to save you time.

Why is it so damn hard?

When you use FFmpeg to create a .Y4M file, it generates it correctly. If you try to open the .Y4M file with a VLC player, for example, it renders well. But if you try to give it to Chrome – Chrome will crash from this .Y4M file.

The reason stems in Chrome’s expectations. The header of the .Y4M file includes some metadata. Part of it is the file type. What FFmpeg has is C420mpeg2 to describe the color space used (or something of the sorts), but Chrome expects to see only C420.

Yes. 5 characters making all the trouble.

The only place we found that details it is here, but it still leaves you with a lot to do to get it done.


Here’s what you need to do:

Prerequisites:

  • The media file
    • We’ve used .mp4 but .webm is just as good
    • Make sure the origin resolution and frame rate is what you need – for the camera source – Chrome will scale down if and when needed
    • The source file should be of high quality – again, assume it comes out directly from a camera
  • Linux
    • You can make do with Windows or Mac – I’ve used Linux for this though
    • I find it easier to handle for command line tasks (and I am definitely not a Mac person)
  • FFmpeg installed somewhere (get it from here, but hopefully you have it install already)
  • sed command line program

Steps:

  1. Convert the file from .mp4 to .y4m format
  2. Remove the 5 redundant characters

Here’s how to do it from the command line. for all of the .y4m files in your current folder:

ffmpeg -i YOUR-FILE-HERE.mp4 -pix_fmt yuv420p
sed -i '0,/C420mpeg2/s//C420/' *.y4m

Running Chrome:

To run Chrome with your newly created file, you’ll need to invoke it from command line with a few flags:

google-chrome --use-fake-device-for-media-stream --use-file-for-fake-video-capture=YOUR-FILE-HERE.y4m

Things to remember:

  • The resulting .Y4M file is humongous. 10 seconds of 1080p resolution eats up a full gigabyte of disk space
  • That sed command? It isn’t optimized for speed but it gets the job done, so who cares? It’s a one-time effort anyways