Tag Archives for " WebRTC "

24

How Many Sessions Can a Kurento Server Hold?

Here’s a question we come across quite often at testRTC.

You decided to self develop your own service. Manage your own media servers. And now that time comes to understand your ongoing costs as well as decide on the scale out scheme – at what point do you launch/spawn a new server to take up some of the load from your current media servers farm? How many users can you cram into a single media server anyway?

We decided to check just that, doing it with the help of WebRTC.ventures who worked with us on the setup.

For the purpose of these set of sizing experiments, we picked up Kurento, one of the most versatile open source media servers out there today. We selected a few key scenarios, and WebRTC.ventures installed the server and configured it for us.

We then used our testRTC probes to understand how many users can we cram on the server in each scenario.

Simple scenario sizing is one step in the process. If you are serious about your service, then check out our best practices to stress testing your WebRTC application.

Get the best practices guide

Why Kurento?

There are a couple of reasons why we picked Kurento for this one.

  1. Because many use it out there, and we’ve been helping customers understand and debug it when they needed to
  2. It is versatile. We could try multiple scenarios with it with relative ease and little programming (although that wasn’t our part of the project)
  3. It does media processing beyond just routing media. We wanted to see how this will affect the numbers, especially considering the last reason below
  4. It’s the first of a few media servers we’re going to play with, so stay with us on this one

The Scenarios

For the Kurento service, we picked up 3 different scenarios we wanted to test:

  1. 1:1 video calls. A typical doctor visitation or similar scenario, where two participants join the same session and the session gets recorded (two separate streams, one for each participant).
  2. 4-way group video calls. The classic scenario, in an MCU configuration. Kurento decodes and encodes all media streams, so we’re giving it quite a workout
  3. Live broadcast. A single person talking to a large group of viewers.

For scenarios (1) and (2) our question is how many concurrent sessions can the Kurento server hold.

For scenario (3) our question is how many viewers for a single broadcast can the Kurento server hold.

The Setup

To set things up for our test, we did the following:

  • We went for a simple AWS t2.medium machine, but quickly had to switch to a more capable machine. We ended up with a c4.2xlarge instance (8 vCPU, 15 GB RAM) on AWS
  • We had it monitored via New Relic, to be able to check the metrics (but later decided to forgo this approach and just use top with root access directly on the machine)
  • We also had an easy way to reset the Kurento server. We knew that rattling it too much between tests without a reset would affect our results. We wanted a clean slate each time we started

The machine was hosted in Amazon US-East.

testRTC probes were coming in from a different cloud vendor, East and West US locations.

We didn’t do any TURN related stuff – so our browser traffic hit the Kurento server directly and over UDP.

The Process

For each scenario, we’ve written a simple test script that can scale nicely.

We then executed the test script in its minimal size.

For 1:1 video calls and broadcasts we used 2 probes and for the 4-way group video call we started with 4 probes.

We ran each test for a period of 4-5 minutes, to check the stability of the media flow.

We used that as the baseline of our results and monitored to see when adding more probes caused the media metrics to start faltering.

1:1 Video Calls

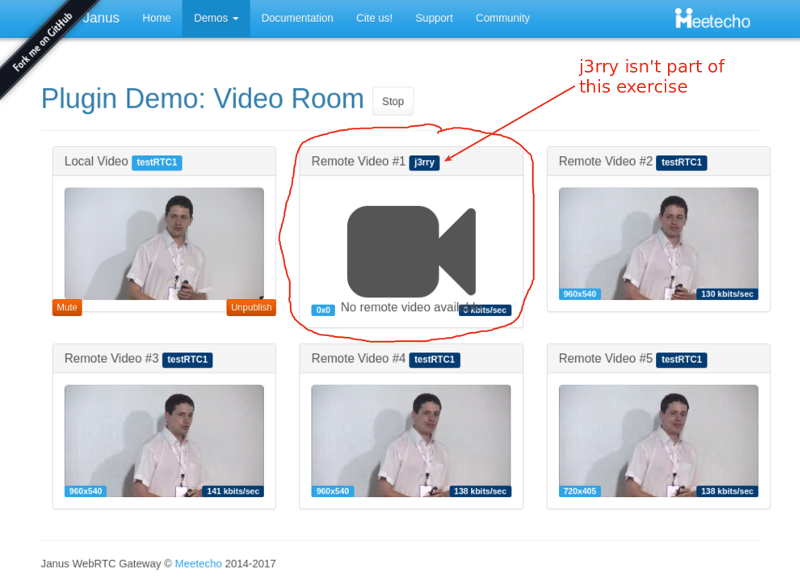
The above screenshot is what you’ll see if you participated in these sessions. There’s a picture in picture view of the session, where the full screen area is the remote incoming video and the smaller window holds our local view.
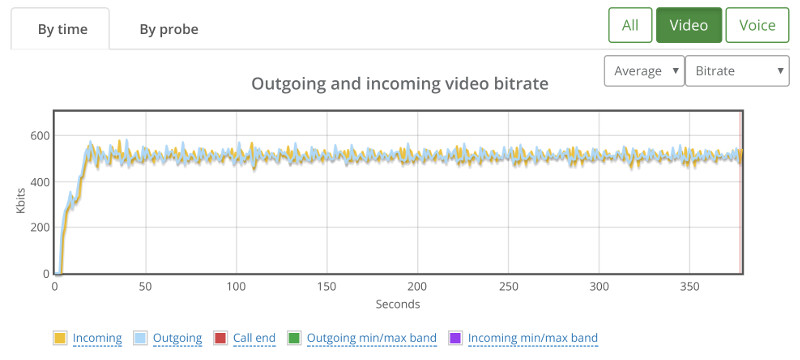
Baseline

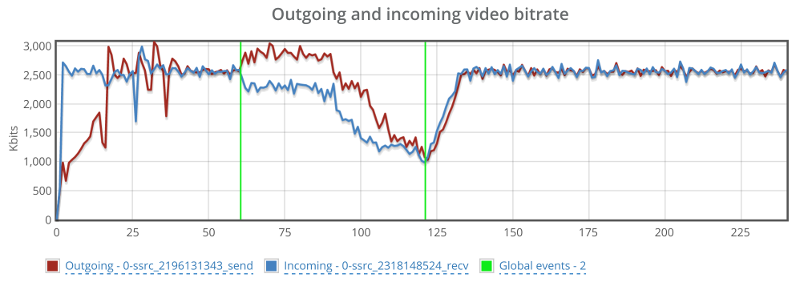
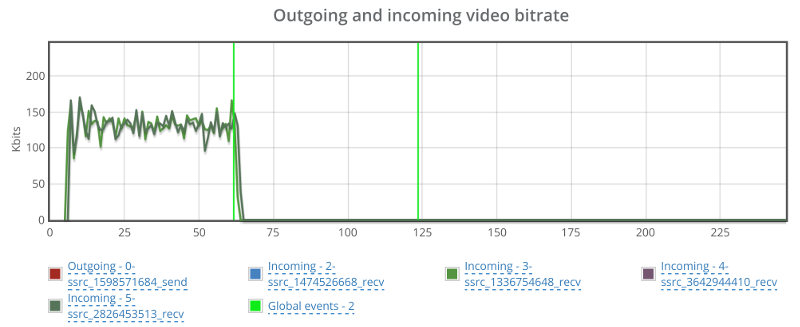
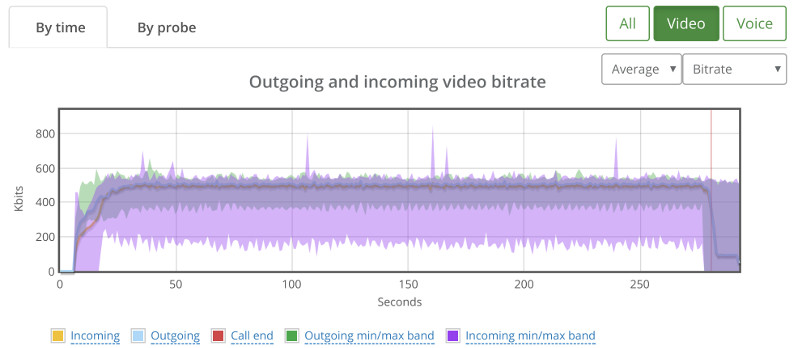
Kurento’s basic configuration limits bitrate of calls to around 500kbps. This can be seen from running a single session in our high level chart:

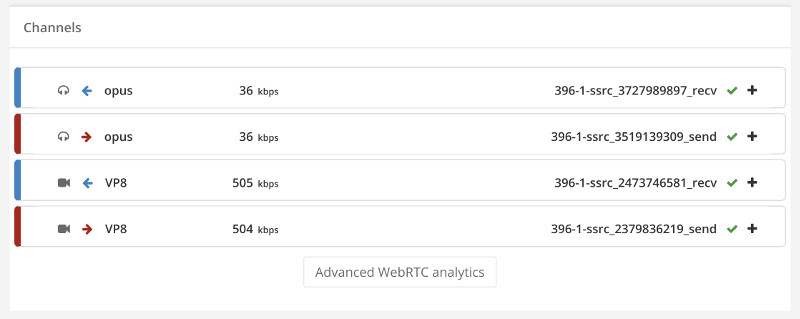
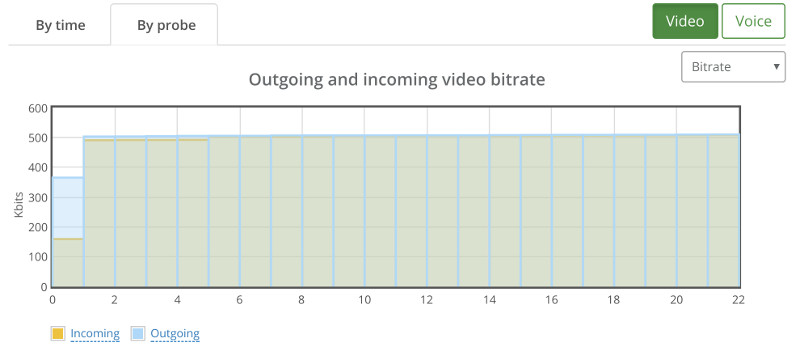
And here’s the stats on the channels of one of the two probes in this baseline test run:

Now that we have our baseline, it was time to scale things up.

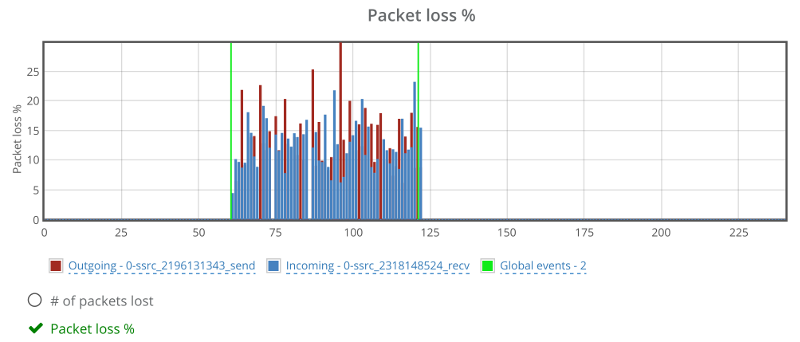
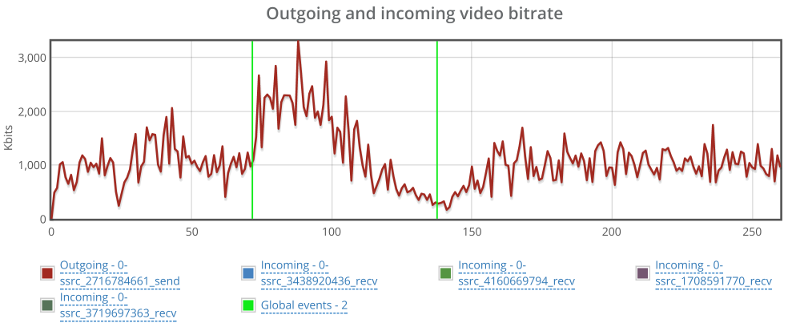
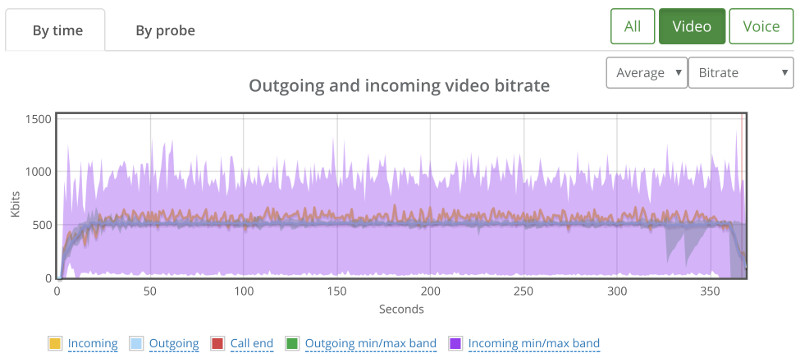
30 Probes (=15 sessions)

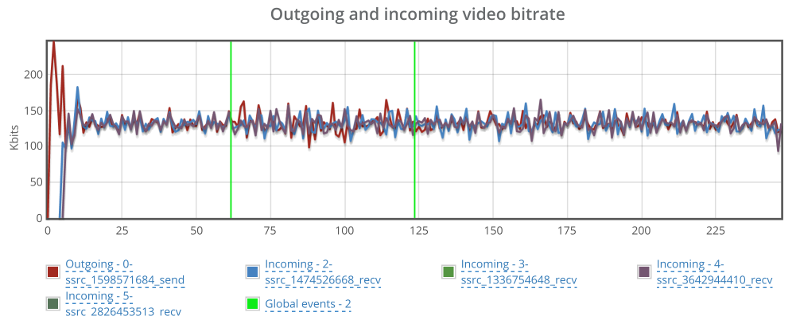
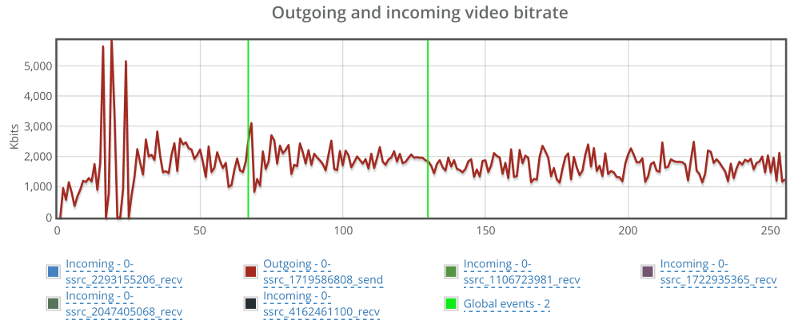
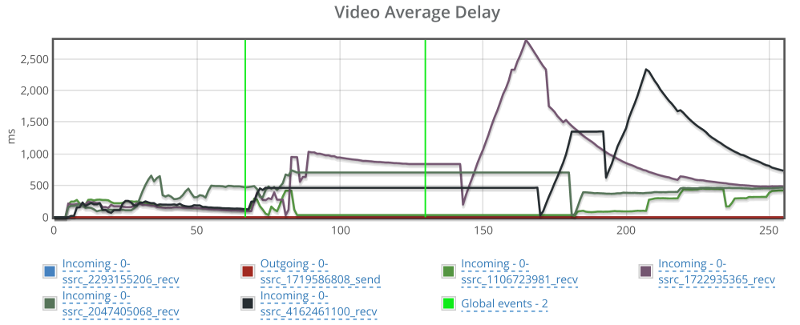
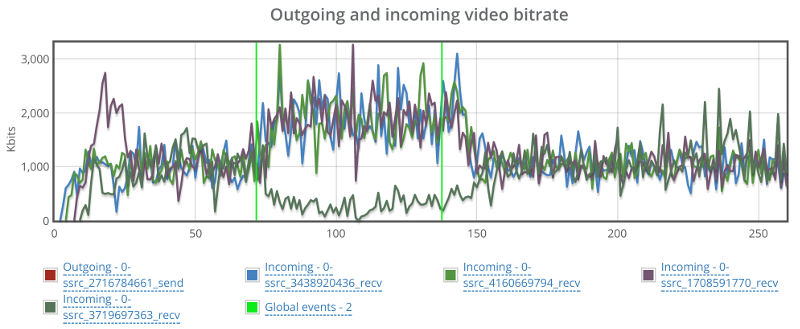
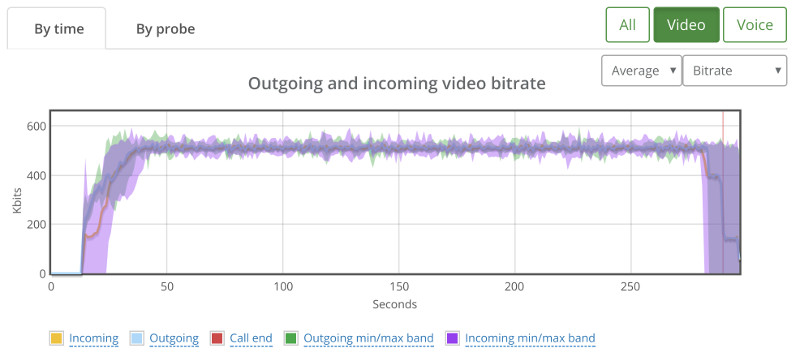
When we went up to 30 probes, running in 15 parallel 1:1 video sessions, we ended up with this graph:

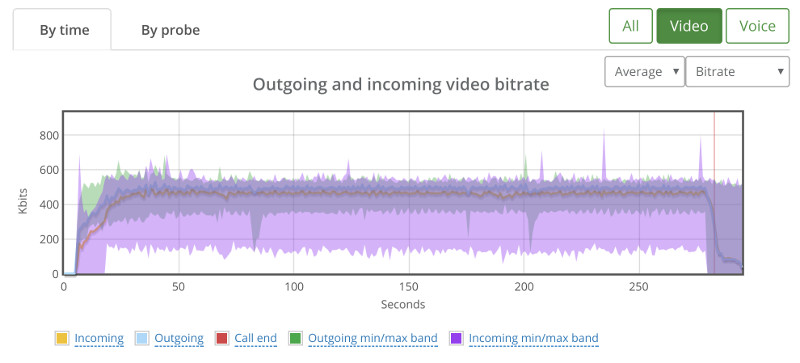
While the average bitrate is still around 500kbps, we can see that the min/max bands are not as stable.

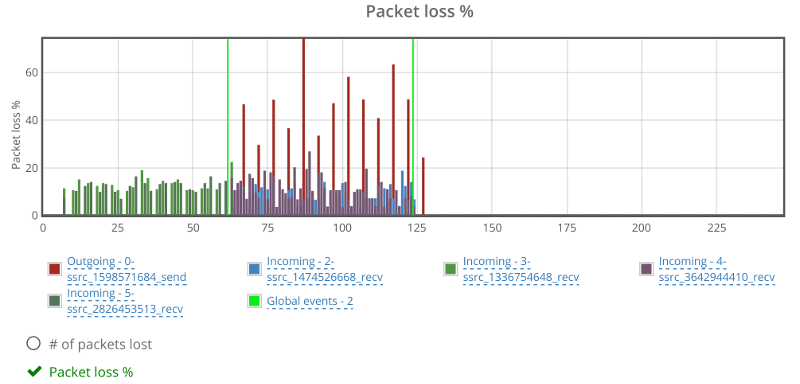
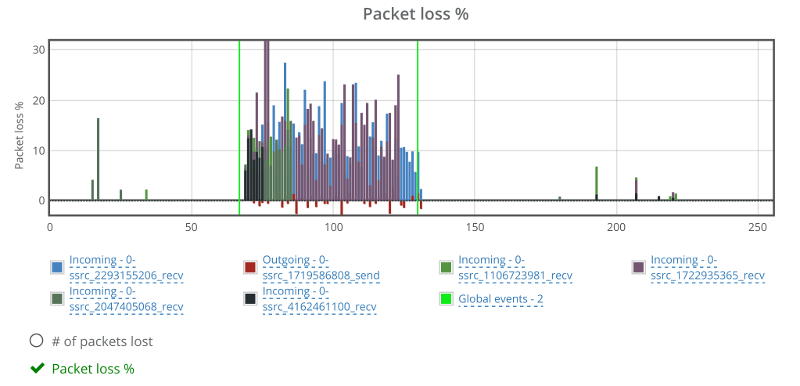
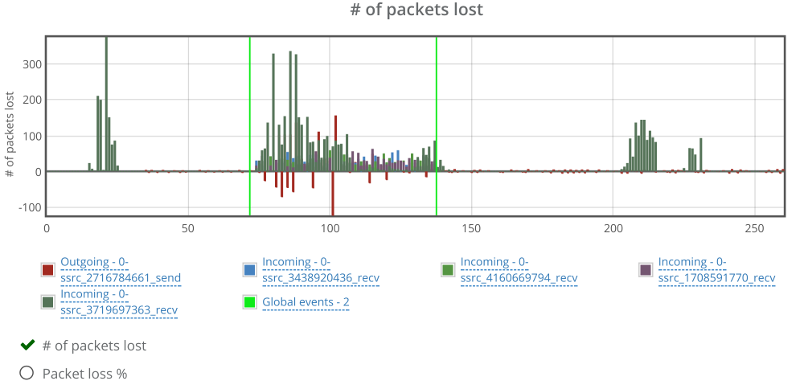
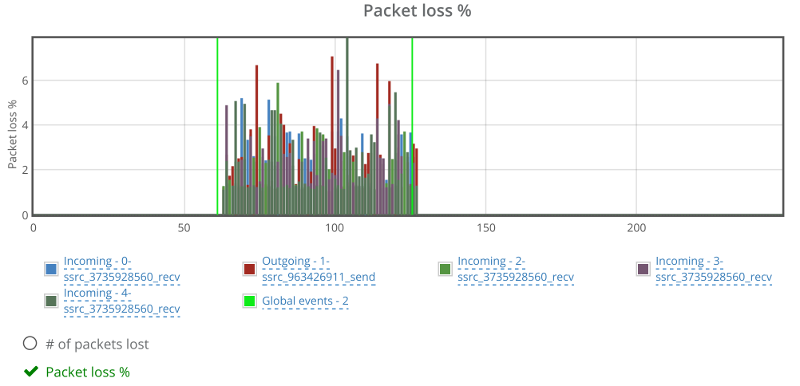
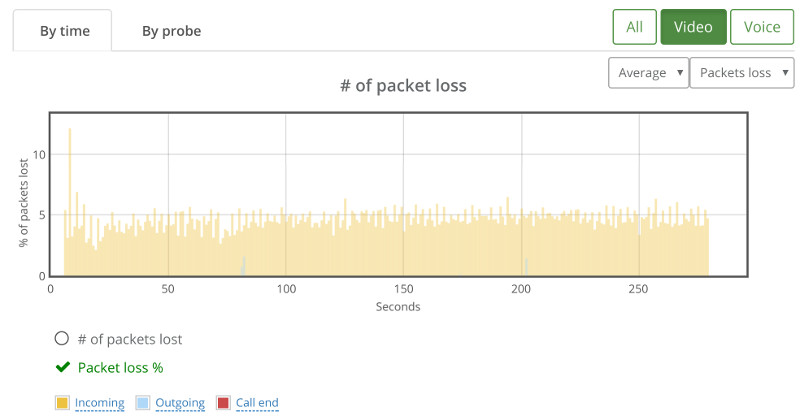
If we look at the packet loss graph, things aren’t happy (the baseline had no packet losses):

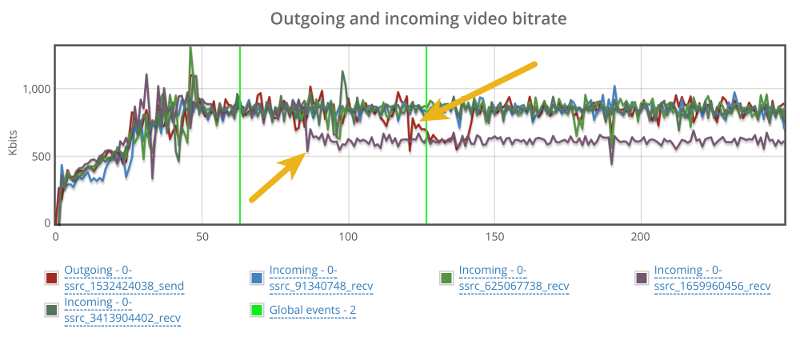
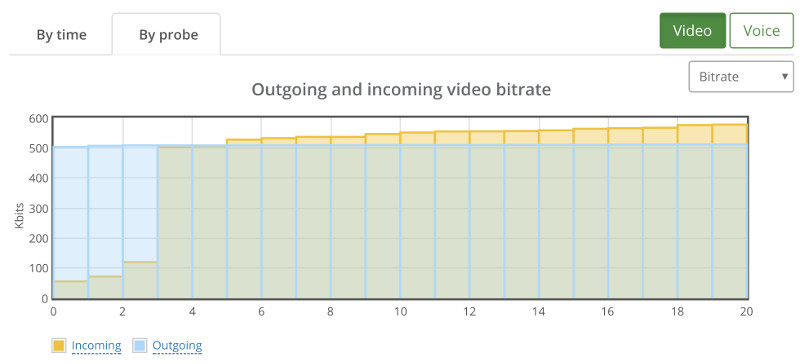
This is where we went for the “By probe” tab, looking at individual bitrates across the probes:

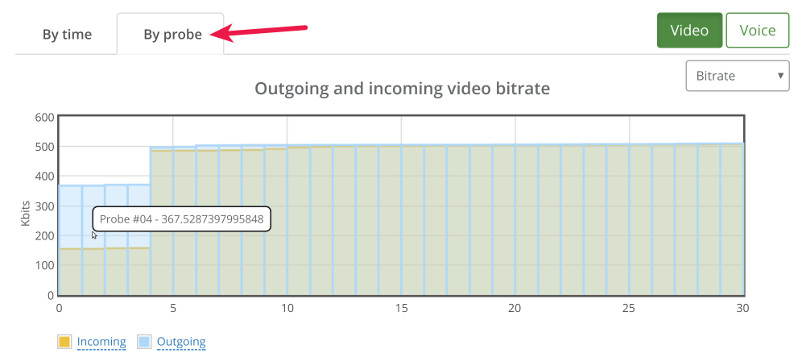
What we can see immediately is that 4 probes out of 30 didn’t get the full attention of the Kurento media server – they got to send and receive less than 500kbps.

If we switch to the packet loss by probe, we see this:

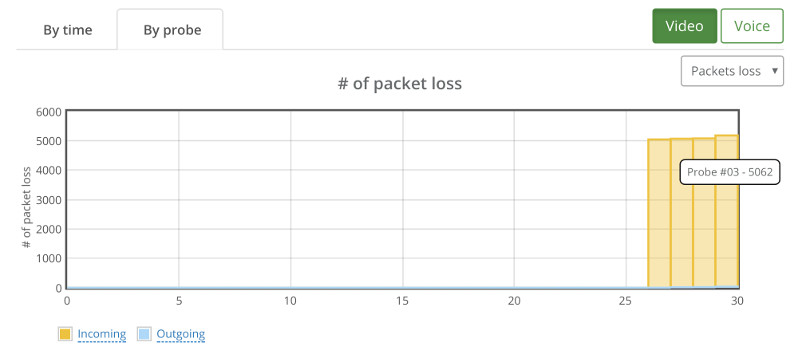
A couple of things that come to mind:

  1. Kurento degrades quality to specific sessions and not across the board. Out of 30 users, 22 got the expected results, 4 had lower bitrates and another 4 had packet losses
  2. There’s correlation here. When Probe #04 exhibits reduction in bitrate, Probe #3 reports incoming packet losses

From here, we can easily go down the path of drilling down to the probes that showed issues. I won’t do it now, as there’s still a lot to cover.

22 Probes (=11 sessions)

It stands to reason then that lowering the capacity to 22 probes should give us pristine results.

Here’s what we’ve seen instead:

We still have that one session that goes bad.

20 or 18?

When we went down to 18 or 20 probes, things got better.

With 20 the issue is that we couldn’t really reproduce a good result at all times. Sometimes, the scenario worked, and other times, it looked like the issues we’ve seen with the 22 probes.

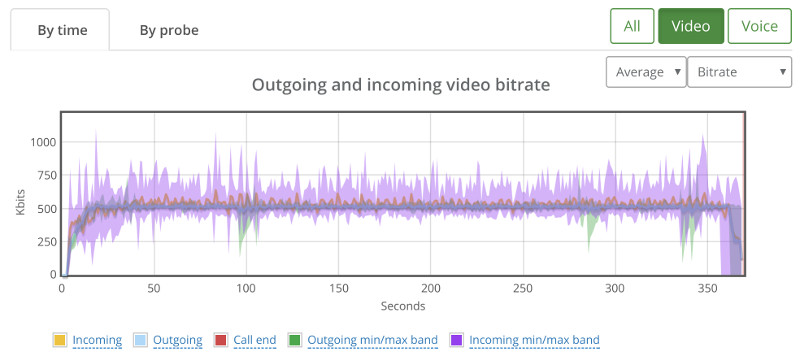
18 though seemed rather stable when tested a couple of times:

Depending on the service you’re offering, I’d pick 18. Or even go down to 16…

4-Way Group Video Calls

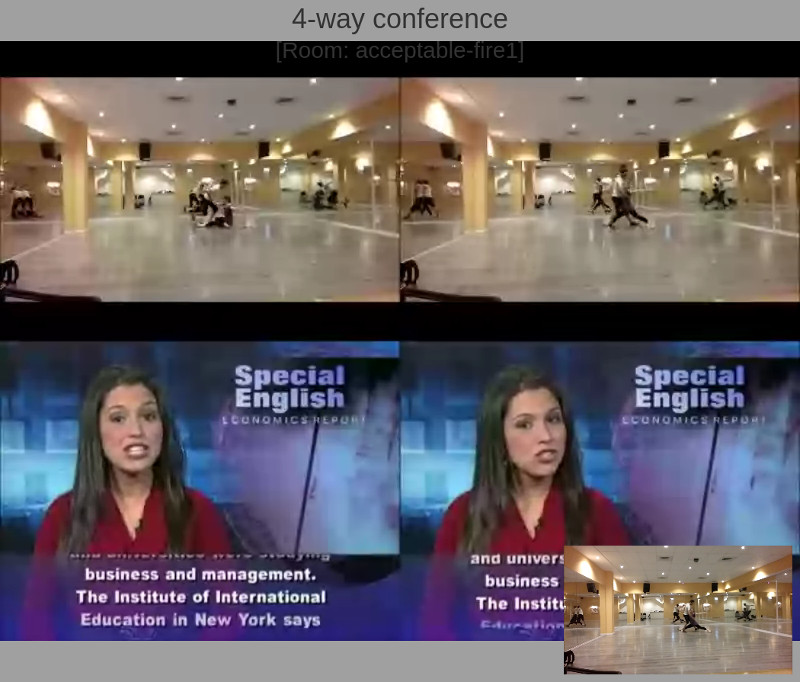
The above is a screen capture of the 4-way group video call scenario we’ve analyzed.

In this case, each probe (browser) sends out video at a resolution of 640×360 and receives a video resolution of 800×600.

The screenshot doesn’t show the images getting cropped, so we can assume the Kurento media server takes the following approach to its pipeline:

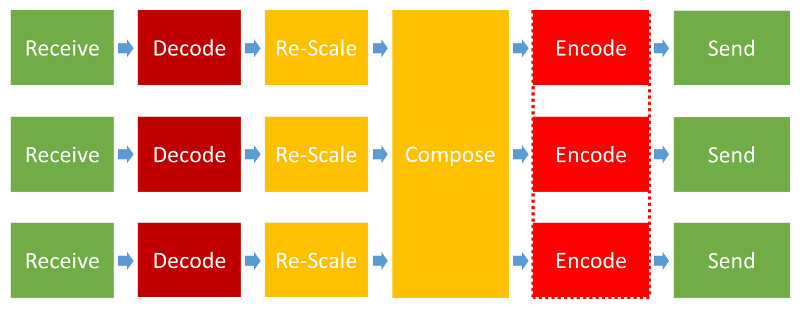
That’s lots of processing needed for each probe added, which means we can expect lower scaling for this scenario.

Baseline

Our baseline this time is going to need 4 probes.

Here’s high the high level video graph looks like:

Not as stable as our 1:1 video calls, but it should do for what’s coming.

Note that each probe still has around 500kbps of video bitrate.

I’ll skip the drill down into the results of a specific probe metrics and take this as our baseline.

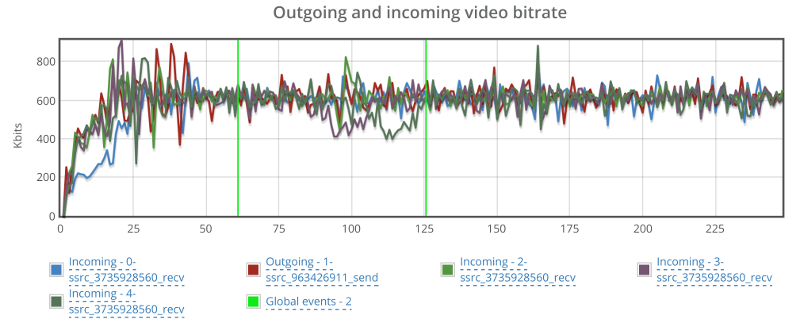
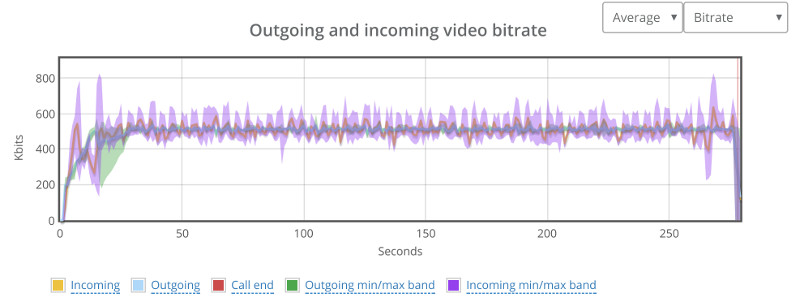
20 Probes (=5 sessions)

Since 1:1 video sessions didn’t go well above 20, we started there and went down.

Here’s how 20 probes look like:

Erratic.

Checking packet losses and bitrates by probe yielded similar results to the bad 1:1 sessions. Here’s the by probe bitrate graph:

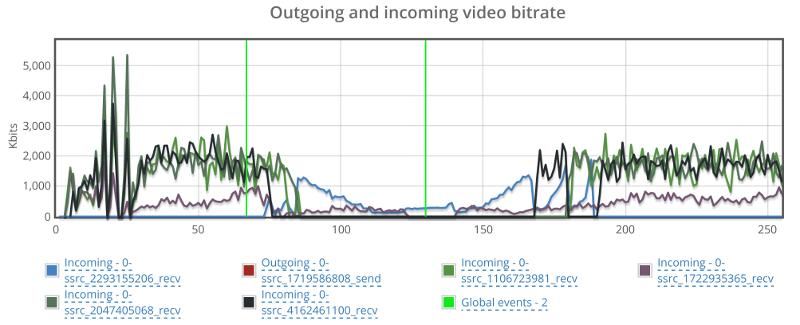
Going down to 16 probes (=4 sessions) wasn’t any better:

I’ve actually looked at the bitrates and packet losses by probe, and then decided to map them out into the sessions we had:

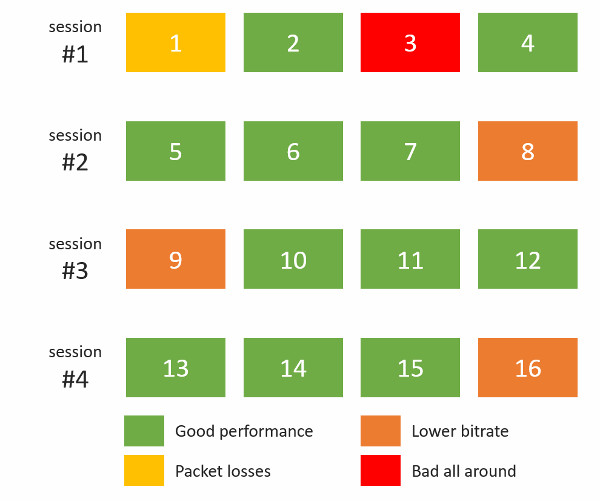
This paints a rather grim picture – all 4 sessions hosted on the Kurento server suffered in one way or another. Somehow, the bad behavior wasn’t limited to one session, but showed itself on all of them.

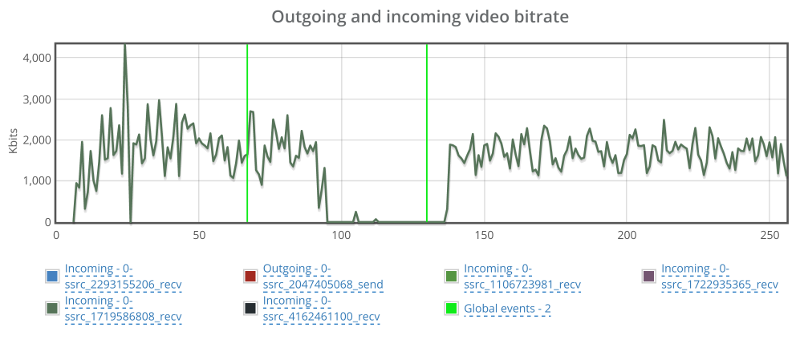
Down to 12 Probes (=3 sessions)

We ended up with 12 probes showing this high level bitrate graph:

It showed some sporadic packet losses that were spread across 3 different probes. The following shows the high level by probe bitrate graph:

There’s some instability in the bitrates and the packet losses which will need some further investigation, but this is probably something we can work with and try and optimize our service to run well.

Live Broadcast

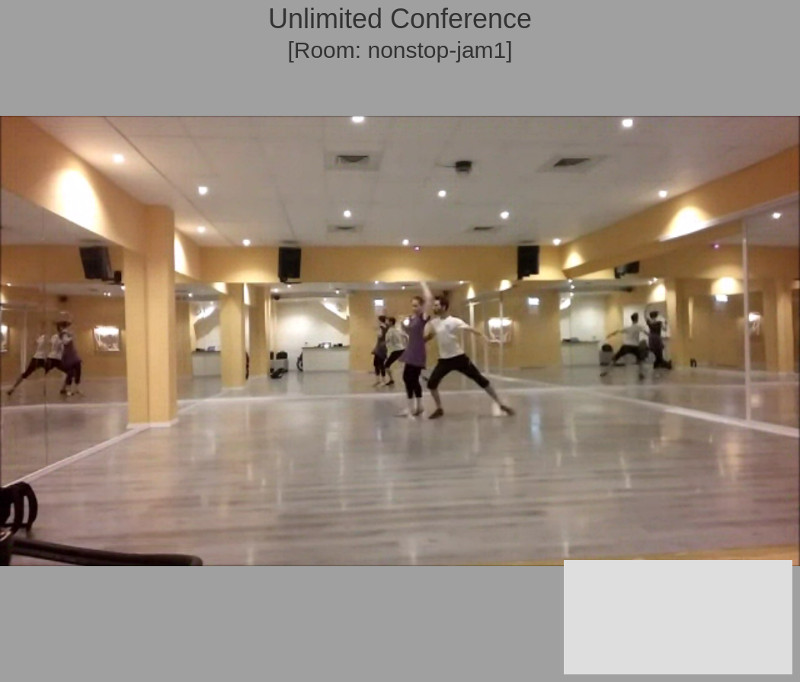
The above screenshot shows what a viewer sees on a live broadcast scenario that we’ve set up using Kurento.

We’ve got multiple testRTC probes joining the same broadcast, with the first one acting as the broadcaster and the rest are just viewers.

Baseline

Our baseline this time is going to need 2 probes. A broadcaster and a viewer.

From now on, we’ll be focusing on what the viewers experience – a lot more than what happens to the broadcaster.

We’re still in the domain of 500kbps for the video channel:

One thing to remember here – outgoing media happens only for our broadcaster probe and incoming media happens for all the other probes.

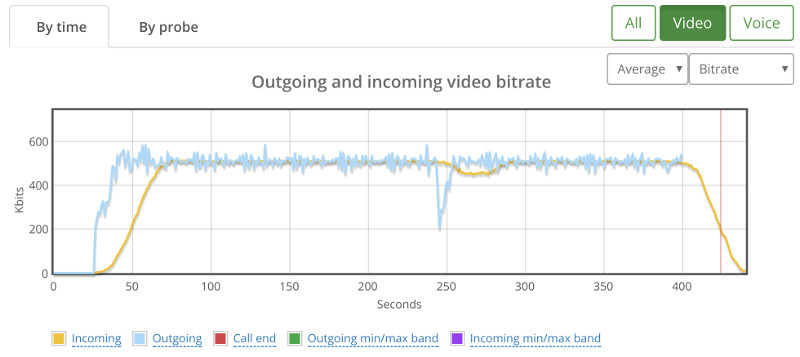
30 Probe (=29 viewers)

We started with 30 probes – assuming we will fail miserably based on our previous tests, and got positively surprised:

Solid bitrate for this test.

Climbing up

We’ve then started moving up with the numbers.

50, 60 and 80 probes went really well.

Got our appetite, and jumped towards 150 probes.

And ended up with this high level graph:

There wasn’t any packet loss to indicate why that drop with the broadcaster at around 240 seconds, so I switch to the “By probe” view.

This showed that things were starting to deteriorate somewhat:

We’re sorting the results just for this purpose – you can see there’s a slight decline in average bitrate across the probes here – something that is a lot less apparent for smaller test sizes. There was no packet loss.

We’ve tried going upwards to 200, but then 12 probes didn’t even connect properly:

Going down to a 100 yielded some connection errors in some of the probes as well. Specifically, I saw this one:

This indicates we’ve got a wee bit of an issue here that needs to be solved before we can continue our stress tests any further. Most probably in the signaling layer of our server. It is either unstable when we place so many viewers at once against it, or just doesn’t really handle the load well enough.

Results Summary

The table below shows the various limits we’ve reached in our rounds of sizing tests:

Scenario Size
1:1 video calls 18 users in 9 parallel sessions
4-way group video calls 3 rooms of 4 users each
Live broadcast 1 broadcaster + 80-150 viewers

What did we learn?

  1. Stress testing for sizing purposes is fun. I actually enjoyed going through the results and running a couple of tests of my own (I didn’t write the scripts or run the initial tests – I delegated that to our support engineer)
  2. Different scenarios will dictate very different sizing. With more time, I’d start working out on finding the bottlenecks and optimizing them – I’m sure more can be squeezed out of a Kurento machine
  3. Once set up and written intelligently, it’s really easy to rerun the tests and change the number of probes used

Next Steps

Once we got to the sweet spot in each scenario, the next thing to do would probably to run it more than once.

We usually setup a testRTC monitor to run once every 15 minutes to an hour for a couple of days on such a scenario, just to make sure we’re seeing stable results more than once.

Other than that, this needs to be tested under different network conditions, varying load factors, etc.

Check out our best practices for stress testing WebRTC applications. It is relevant even if you are not using testRTC

Get the best practices guide

I’d like to thank WebRTC.ventures for the assistance in setting this one up. If you are looking for a capable vendor to custom build your WebRTC application – check them out.

11

How do WebRTC Media Servers Behave on Packet Loss?

Differently from each other.

Whenever I see people comparing WebRTC media servers, they tend to focus on scale:

– How many sessions can you cram in parallel?

– How many streams can you serve from a single machine?

– How much bitrate can you pump out?

All of these are very important questions – they end up in your sizing calculation that then go into your pricing model for your service. Oh, and we did cover this a bit here when talking about handling WebRTC browsers synchronization at scale.

Now that our new version is taking shape (still in staging, so if you want access – ping us), it is time to play a bit with a few new toys we’ve added for our beloved community of sadists (you may know them as test engineers, but the good ones are sadists – they like inflicting pain upon digital products and services).

What I am talking about here is a combination of two script commands we have:

  1. rtcEvent() – place a vertical event in the graphs
  2. rtcSetNetworkProfile() – change network profiles in runtime

You’ll see how it looks in a second.

What Packet Loss Does?

Packet loss is bad.

You don’t control it. And it can happen at any time. Come and go as it pleases.

The moment you have packet loss, there will be some degradation in the quality of the media. Lost packets means lost data. Means can’t playback something. It might be minor. It might be important.

Next thing that happens? WebRTC (or most other VoIP products for that matter) will start lowering bitrates. Why? Because it assumes there’s congestion on the network, and it is trying to play nice with everyone.

But what happens once that packet loss is gone? Does things go back to normal? And if they do, then how fast will that happen?

My Experiment

I decided to devise a simple enough experiment to get some answers here. I chose the following steps:

  1. Connect to a service
  2. Run for a full minute
  3. Set packet loss to 10% for a full minute
  4. Go back to normal – no packet loss
  5. Wait two minutes

That’s it. What I am interested in is less of what happens during the second minute, but more what happens in the last two minutes, and how that is different than what we have in the first minute of the session.

In general, I decided to place 5 users in the same session, to get that media server working a bit. And I also decided to focus on the SFU kind.

The services I tinkered with are:

  1. AppRTC, just as a baseline for this exercise
  2. Janus, an open source media framework, that can act as an SFU
  3. Jitsi Videobridge, an open source SFU
  4. mediasoup, a relatively new open source SFU
  5. SwitchRTC, a commercial SFU
  6. appear.in, a service that recently added its own self-developed SFU (in beta at the moment)

If you are looking for Kurento or other SFUs – they weren’t included not because I didn’t want to, but because there was no readily available installation out there that I could just use.

I’ll be happy to add more SFUs to the comparison, so give us a shout out if you want to run such an analysis.

Let the fun begin.

AppRTC – My Favorite Baseline

For our baseline, I decide to use AppRTC.

This time, I had to use only 2 browsers, as AppRTC doesn’t support any group calling capabilities.

What it does do is offer the vinyl WebRTC experience.

I started with writing a simple script to fit my needs:

var roomUrl = process.env.RTC_SERVICE_URL + "testRTC" + process.env.RTC_SESSION_IDX + '?vsc=VP8';

var agentType = Number(process.env.RTC_IN_SESSION_ID);
var recuperationTime = 60; // in seconds

client
   .rtcInfo(roomUrl)
   .rtcProgress('open ' + roomUrl)
   .url(roomUrl)
   .waitForElementVisible('body', 60000)
   .pause(2000)
   .click('#confirm-join-button')
   .waitForElementVisible('#videos', 20000)
// Minute 1
   .pause(recuperationTime * 500)
   .rtcScreenshot('Phase 1')
   .rtcProgress('Phase 1')
   .pause(recuperationTime * 500);

// Minute 2
   if (agentType === 1) {
   client
       .rtcEvent('10% Packet Loss start', 'global')
           .rtcSetNetworkProfile('custom', 'packet loss', 10, 'both', 'both'); // 10% packet loss
   }

client
   .pause(recuperationTime * 500)
   .rtcScreenshot('Phase 2')
   .rtcProgress('Phase 2')
   .pause(recuperationTime * 500)

   if (agentType === 1) {
    client
       .rtcSetNetworkProfile('') // back to pristine network conditions
       .rtcEvent('10% Packet Loss End', 'global');
   }

// Minute 3-4
client
   .pause(recuperationTime * 1000)
   .rtcScreenshot('Phase 3')
   .rtcProgress('Phase 3')
   .pause(recuperationTime * 1000);

A few things to note here:

  1. All test scripts on this post can be found on our github account. Easiest way to use them is to import them into your testRTC account
  2. I decided to force VP8 here. VP9 is erratic a bit in its bitrate so I wanted to go for VP8 – hence the addition of ‘?vsc=VP8’ in the first line of this script (check out all of AppRTC’s parameters here)
  3. When the second minute is up, the first probe in each session will generate a global rtcEvent and set packet loss in both directions to 10% (look at lines 23-27)
  4. After an additional second is over, the first probe in each session will generate another global rtcEvent and remove all packet loss and network constraints that might have been used (look at lines 35-39)

Running that using testRTC yields these results once you drill into one of these sessions:

Above you see two things:

  1. The green vertical lines – these are the result of the rtcEvent() calls
  2. The blue and red bars, showing incoming and outgoing packet loss percentage, which averages at 10%

Above you see the video bitrate graph, with the two horizontal lines on it.

Notice how the outgoing bitrate tries going up in the beginning and then drops from 2.5mbps to 1mbps in 60 seconds?

The other thing that interest me is the time it takes for WebRTC/AppRTC to get back to 2.5mbps. And that’s somewhere in the range of 15-20 seconds.

Oh, and because I know you’ll be interested in this – also remember this screenshot of the video average delay we had:

Before we move on to the media servers – remember that what I tried doing with AppRTC is provide a baseline. And the baseline here is “picture perfect”. I didn’t really expect any of the SFUs that I’ve used to be able to match AppRTC with its metrics.

Janus

Janus is an open source media server created and maintained by Meetecho.

They have an online demo running that supports a simple video room.

So we just hooked our script on top of that to get the results we needed. We aimed for 5 browsers in a single room – which will be the norm from now on in this article.

The Janus demo has somewhat of a single room, and I had to end up with a J3rry user in there, though he seemed harmless with no camera or bitrate in my session.

You can see above that the bitrates are rather low – around 140 kbps for each video stream coming into this room. And that’s even before I started adding packet loss.

During packet loss and after it, we “lost” two participants. Here’s a screenshot taken a minute after I stopped packet loss altogether:

The graphs in testRTC show a grim picture:

Janus reports packet losses at higher intervals than what WebRTC does, which is why we see the spikes on the outgoing reporting that go up to 50% and more. The weird thing is the two incoming channels that show around 10% of packet loss as well. Which is weird – more about this later.

Here’s how video bitrates look like for some of the streams (one outgoing and two incoming):

No change even though we have packet loss.

And here’s what happens in the two other incoming streams:

Apparently, these two incoming streams are the ones showing packet loss from the start. They somehow decided to drop to 0 the moment we cranked up the artificial packet loss from 0 to 10% – but never recuperated from it.

Looking at the average delay for the video…

Things can’t be good, but seems like this has nothing to do with my packet loss shenanigans.

It might be Janus and it might just be the demo machine. If I could, I’d reboot it and start all over again.

Jitsi

For me the Jitsi Videobridge is where I go first to run demos and tests on an SFU with testRTC:

  • It is out there
  • It is easy to automate
  • And I am a creature of habit…

To run our test here, we’ve directed 5 of our probes into a single room on the Jitsi meet online service/demo.

After a few attempts, I decided it would be better to disable simulcast, using this prefix to the URL: ‘#config.disableSimulcast=true’. I didn’t do it because simulcast is a bad thing, but because it made analyzing the results much harder for what I had in mind.

If we look at the packet loss graph, it will tell a similar story to what we’ve seen so far:

While there are some packet losses out of the one minute killzone I created, they are negligible (or at least sporadic). That negative values you see for packet losses in the red color? They are reports of the browser’s outgoing stream from the machine we induced packet loss on. This is most probably related to a Chrome bug (HT to Philipp Hancke).

I’ve split the video bitrate graphs here into two graphs – the outgoing one and the incoming ones since they tell two separate stories.

This one caught me by surprise – the outgoing bitrate shows no signs of a change due to packet loss. I wonder what Jitsi is doing (or not doing) to have packet loss ignored in such a way. So I decided to look at it from the receiving end of one of the other four browsers in the same session:

Bitrate drops to 0 for a duration of almost a full minute before coming back up.

Back to the browser with the trashed network, let’s see what happens to the incoming video streams:

Things drop down from around 2mbps to almost 0 on all incoming channels, taking around 40-60 seconds to get back to normal.

One last glance before we move on – check out video average delay:

Jitsi had some hard time recuperating from that packet loss.

It should be noted that I’ve played around with Jitsi before their recent updates – especially the ones including adaptivity.

Mediasoup

mediasoup is a rather new player in the open source SFU space. It is built in C++ as a Node.js module. After a quick Twitter chat, Iñaki Baz Castillo was kind enough to configure it to my needs (specifically, allowing for more bandwidth on the online demo).

Starting as always with packet loss:

The graph seems fine. Percentages are low because of the way packet losses are reported back from the media server. Probably some FEC / retransmissions are involved as well (this would be the case with many of the media servers out there).

Looking at the video bitrate, we see an interesting picture:

There’s a hiccup in the outgoing bitrate (the red line), but that for some reason takes place close to the end of the 60 seconds packet loss window.

There’s also a reduction in incoming bitrate for one of the video stream. It starts around 20 seconds into the packet loss zone, but it doesn’t recover even when we remove the packet losses.

Video delay is also a bit problematic:

It starts off nicely, goes up when packet losses start and never recuperates.

SwitchRTC

Moving on from open source to commercial, there’s SwitchRTC.

It started by me asking for a 2mbps bitrate limit. Now, the way this was set up and without simulcast, it meant the browser is going to need to encode 2mbps and decode 4 streams of 2mbps each. This turned out to be a bit too much for the way we configure our machines (and frankly – probably too much for almost any use case you plan on deploying when it comes to assuming what your typical customer may have).

The end result of it was graphs that went all over the place – each stream and each browser tried hard to compete on resources that were limited, and it wasn’t really nice.

So we dialed back down to 1mbps bitrate limit.

As always, let’s first look at the packet loss graph:

Two things here to note:

  1. One of the incoming video streams has packet losses outside the packet loss zone. Not unheard of, but a bit off the charges compared to others. I think that is due to the data centers used by SwitchRTC for this demo
  2. There’s negative packet losses on the outgoing video stream. This is due to the way SwitchRTC handles packet loss reporting (or more likely filtering packet loss reporting)

For bitrate, I took two screenshots. One for the incoming video streams and one for the outgoing video stream.

On the incoming stream we see an interesting phenomena.

When packet loss starts, bitrate picks up, most likely to overcome the packet loss. It makes sense, since we didn’t limit bitrates, so that seems like the correct strategy. Would be interesting to see what will happen if we limit bitrate as well.

The second thing, is that we have one of the incoming stream dropping down to almost zero and then picking up again. This is the same stream that shows high packet losses. I wonder what causes that.

The graph above shows the outgoing video stream. This is almost textbook behavior for the outgoing video. Once it notices there’s issues, it starts increasing bitrate to compensate, and when that fails – it drops down slowly. It is similar, though not as smooth as what you see with AppRTC.

appear.in

appear.in have a beta SFU, which Philipp Hancke was kind enough to let me use.

Now, appear.in isn’t a media server or a component you can use in your own service – it is a full service, which makes this comparison a bit unfair – checking demos and comparing them to a commercial service.

But then I wanted to check this one out, as it isn’t based on any external framework – it was self developed in house at appear.in

The results are interesting.

Packet loss graph looks rather nice, if a tad low in the percentage:

This shows how far appear.in goes in gauging and polishing the way they make use of network resources.

Video bitrate stays at the 600kbps vicinity – not showing any real effects from my additional packet loss:

Best part though is that the video delay graph doesn’t look erratic:

I am not sure how to compare these results to the rest. I will need more time to check this out – time that I just didn’t have available for this experiment of mine. I will leave it for some future tinkering.

Summing things up

Different media servers will act differently. Especially when putting them under different network conditions.

What I wanted to show here, is how you can use testRTC to goof around with whatever setting you want. Here are a few other ideas:

  1. Drop the network down to 0 bitrate. Wait a bit. Put it back up. Did media return? How quickly did it come up again?
  2. Limit bitrates to different levels. Check if your media server adapts things like resolutions and other interesting parameters to fit the needs
  3. Go down to 50 or 100 kbps. Does video persist or is the media server shutting it down in favor of audio?
  4. Limit bitrate and add a bit of packet loss at the same time (this would be closest to real life). See what happens then – how will the media server behave?
  5. Do the above while adding some load on the server. Does it start fidgeting or is it handling this nicely?

A few things to remember here:

This isn’t an apples to apples comparison

I haven’t taken each and every media server and installed it on my own on the same server configuration. I just used the online demos each of these vendors had. At times, asking for assistance and a bit of configuration from the vendor.

What was different:

  • The server(s) the media server was installed on
  • The configuration of the server, especially what max bitrate it allows

What was similar:

  • I tried disabling simulcast in all servers. Assume that’s a bad thing to do, but I wanted a level playing field on that front
  • The browser used. It was the same for all tests. This includes their version, the machine they were installed on, the network they used, their geographical location – everything
  • The scenario itself. I essentially executed the same scenario over and over again in front of different media servers

Where do we go from here?

Media servers are hard to develop. They are hard to tweak and optimize. And they are hard when it comes to making sizing decisions with them.

They are also pretty good. Most of the ones shown here are running in production services with live customers.

When you go tomorrow to pick the media server for your own project. Or when you want to plan how to size capacities per machine. Or if you want to check your media server in real life scenarios – we’ve got your back.

Check us out. I am sure we can be of help to you.

1

Your best WebRTC debugging buddy? The webrtc-internals API trace

This time, we take you through the webrtc-internals API trace to see what can you learn from it.

To make this article as accurate as possible, I decided to go to my source of truth for the low level stuff related to WebRTC – Philipp Hancke, also known as fippo or hcornflower. This in a way, is a joint article we’ve put together.

Before we do, though, you should probably check out the other articles in this series:

  1. Parameter’s meaning in webrtc-internals
  2. Finding the current active connection in webrtc-internals

Now back to the API trace.

WebRTC is asynchronous

Here’s something you probably already noticed. WebRTC is asynchronous to the extreme. It almost painstakingly makes sure that whatever you are trying to achieve – you won’t be able to without multiple calls in different contexts of your JavaScript app in the browser.

It isn’t because the authors of WebRTC are mean. It is because the nature of communications is asynchronous. It is made worse by the various network topologies that require the use of curses like STUN, TURN and ICE and by the fact that we require the user to authorize things like accessing his camera.

This brings us to the tricky situation of error handling. With WebRTC, it takes place everywhere. Anything you do can fail twice:

  1. When you call the API and it returns
  2. When the callback/promise/event handler/whatever returns back with the result of your API call

This means that in many cases, you are going to be left with a half baked solution that looks at some of the error cases (did you ever see a sample that takes care of edge cases or failure scenarios?).

It also means that often times you’ll need to be able to debug them. And that’s what the API trace in webrtc-internals can help you with.

The webrtc-internals API trace

If you open chrome://webrtc-internals while in an active WebRTC session, you will immediately see the API trace:

WebRTC API trace sample

This is the list of API calls and events done on the peer connection, informing you of the progress and state of the connection.

You can click on any of these APIs to see its parameters.

WebRTC API trace click to expand

Before we look at what kind of analysis we can derive from these traces, let’s look at what some of the connection methods and events do.

    • addStream: if this method was called, the Javascript code has added a MediaStream to the peerconnection. You can see the id of the stream as well as the audio and video tracks. onAddStream shows a remote stream being added, including the audio and video track ids, it is called between the setRemoteDescription call and the setRemoteDescriptionOnSuccess callback
    • createOffer shows any calls to this API including the options such as offerToReceiveAudio, offerToReceiveVideo or iceRestart. createOfferOnSuccess shows the results of the createOffer call, including the type (which should be ‘offer’ obviously) and the SDP resulting from it. createOfferOnFailure could also be called indicating an error but that is quite rare
    • createAnswer and createAnswerOnSuccess and createAnswerOnFailure are similar but with no additional options
    • setLocalDescription shows you the type and SDP used in the setLocalDescription call. If you do any SDP munging between createOffer and setLocaldescription you will see this here. This results in either a setLocalDescriptionOnSuccess or setLocalDescriptionOnFailure callback which shows any errors. The same applies to the setRemoteDescription and its callbacks, setRemoteDescriptionOnSuccess and setRemoteDescriptionOnFailure
    • onRenegotiationNeeded is the old chrome-internal name for the onnegotiationneeded event. If your app uses this you might want to look for it
    • onSignalingStateChange shows the changes in the signaling state as a result of calls to setLocalDescription and setRemoteDescription. See the wonderful diagram in the specification for the gory details. At the end of the day, you will want to be in the stable state most of the time
    • iceGatheringStateChange is the little brother of the ice connection state. It will show you the state of the ice gatherer. It will change to gathering after setLocalDescription if there are ICE candidates to gather
    • onnicecandidate events show all candidates gathered, with information for which m-line and MID. Likewise, the addIceCandidate method shows that information from the other side. Typically you should see both event types. See below for a more detailed discussion of these events
    • oniceconnectionstate is one of the most important event handlers. It tells you whether a peer-to-peer connection succeeded or not. From here, you can start searching for the active candidate as we explained in the previous post

The two basic flows we can see are that of something offering connections and answering. The offerer case will typically consist of these events:

WebRTC API Trace - offer side

  • (addStream if the local side wants to send media)
  • createOffer
  • createOfferOnSuccess
  • setLocalDescription
  • setLocalDescriptionOnSuccess
  • setRemoteDescription
  • (onaddstream if the remote end signalled media streams in the SDP)
  • setRemoteDescriptionOnSuccess

While the answerer case will have:

WebRTC API Trace - answer side

  • setRemoteDescription
  • (onaddstream if the remote end signalled media streams in the SDP)
  • createAnswer
  • createAnswerOnSuccess
  • setLocalDescription
  • setLocalDescriptionOnSuccess

In both cases there should be a number of onicecandidate events and addIceCandidate calls along with signaling and ice connection state changes.

Let us look at two specific cases next.

Example #1 – My WebRTC app works locally but not on a different network!

This is actually one of the most frequent questions on the discuss-webrtc list or on stackoverflow. Most of the time the answer is “you need a TURN server” and “no, you can not use some TURN server credentials that you found somewhere on the internet”.

So it works locally. That means that you are creating an offer, sending it to the remote side, calling setLocalDescription() and are getting an answer that you feed into setRemoteDescription(). It also means that you are getting candidates in the onicecandidate() event, sending them to the remote side and getting candidates from there which you call the addIceCandidate() method with.

And locally you get a oniceconnectionstatechange() event to connected or completed:

WebRTC API trace - ICE state changes

Great! You probably just copied and pasted these pieces of code from somewhere on github.

Now… why does it not work when you’re on a different network? On different networks, you need both a STUN and a TURN server. Check if your app is using a STUN and TURN server and that you’re passing them correctly at the top of webrtc-internals:

NAT configuration in webrtc-internals

As you can see (assuming you have good eyes), there are a number of ice servers used here. In the case of our screenshot, it’s Google’s apprtc sample. There is a stun server, stun:stun.l.google.com:19302. There are also four TURN servers:

  1. turn:64.233.165.127:19305?transport=udp
  2. turn:[2A00:1450:4010:C01::7F]:19305?transport=udp
  3. turn:64.233.165.127:443?transport=tcp
  4. turn:[2A00:1450:4010:C01::7F]:443?transport=tcp

As you can see, apprtc uses TURN over both UDP and TCP and is running TURN servers for both IPv4 and IPv6.

Now just because you configured a TURN server does not mean there won’t be any errors. The TURN server might not be reachable. Or your credentials might not work (this will happen if you “found” the credentials on a list of “free public servers”). In order to verify that the STUN and TURN servers you use actually work you need to look at the onicecandidate() events.

If you use a STUN or a TURN server, you should see a onicecandidate() event with a candidate that has a ‘typ srflx’.

Similarly, if you use a TURN server, you need to check if you get an onicecandidate() event where the candidate has a ‘typ relay’.

Note that Chrome stops gathering candidates once it establishes a connection. But if your connection gets established you are probably not going to debug this issue.

If you get both of these you’re fine. But you also need to check what candidates your peer sent you with which addIceCandidate() was called.

Example #2 – The network is blocking my connection

Networks that block UDP traffic are quite common. TURN/TCP and TURN/TLS (as well as ICE-TCP even though we mention this mostly to make Emil Ivov happy) provide a way to enable calls even on those networks. This has some effect on the media quality as we discussed previously but let us see how we can detect whether we are on a network that is blocking UDP traffic to begin with.

If you want to follow along, open webrtc-internals and the webrtc candidate gathering demo page and start gathering. By default, it uses one of Google’s STUN servers. To keep things simple, uncheck the “gather IPv6 candidates” and “gather RTCP candidates” boxes before clicking on the “gather candidates” button:

Uncheck ICE gathering candidates

On webrtc-internals you will see a createOffer call with offerToReceiveAudio set to true (this is to create an m-line and gather candidates for it):

WebRTC ICE gathering receive audio

Followed by a createOfferOnSuccess and a setLocalDescription call. After that there will be a couple of onicecandidate events and an icegatheringstatechange to completed, followed by a stop call.

There should be an onicecandidate with a candidate that has a “typ srflx” in it:

ICE candidate types

It shows your public ip. If you don’t get such a candidate but only host candidates, either the STUN server is not working (which in the case of Google’s STUN server is somewhat unlikely) or your network is blocking UDP.

Now block UDP on your network (but mind you, do not block port 53 for DNS). If you don’t know a quick way to block UDP, lets try to simulate that by changing the stun server to something that will not respond, in this case Google’s well-known DNS server running at 8.8.8.8:

Fudging STUN configuration for WebRTC

Click “gather candidates” again. After around 10 seconds you will see a gathering state change to completed in webrtc-internals. But you will not see a server-reflexive candidate:

ICE negotiation with no STUN connectivity

You can try the same thing with a TURN UDP server. Make sure your credentials are valid (again, the “public TURN server list” is not a thing). This will show both a srflx and a relay candidate.

One of the nice tricks you can do here is to change the password to something invalid. Then you will only get a srflx but no relay candidate. Which is a nice and easy way to detect if your credentials are invalid — the candidates page even suggests this.

You can repeat this with TURN/TCP and TURN/TLS servers. You can even add all kinds of TURN servers and then use the priority trick we have shown in the last blog post to figure out from which servers you gathered candidates.

If you don’t get anything but host candidates you might be on a network which blocks both UDP traffic and is successful at blocking TURN/TCP and TURN/TLS. One scenario where that might happen currently is if there is a proxy that requires authentication which is not yet supported by Chrome.

Now let us take a step back. When is this useful? In a real-world scenario you will want to run with all kinds of STUN and TURN servers, otherwise you will get high failure rates. If you need to debug a failure to establish a connection, you should look for the onicecandidate and addIceCandidate events. They will allow you to figure out if the local or remote client was on a network that blocked it from establishing a connection to any peer outside the network.

What’s next?

So this time around, we’ve focused on the API traces:

  • We’ve acquainted with the fact that this is something that webrtc-internals does us a great service just by capturing all of these WebRTC API calls
  • We even went through the typical API calls and flows that are expected to appear in the WebRTC API trace
  • We’ve looked at two examples where the WebRTC API trace can help us debug the problems we’re seeing (there are more)
    • #1 – misconfiguration of NAT traversal servers
    • #2 – network blocking and the forgotten TURN/TCP configuration

We’re not done yet with this series. We still have one or more articles in the pipeline to close the basics of what webrtc-internals got up its sleeves.

If you are interested in keeping up with us, you might want to consider subscribing.

Huge thanks for Fippo in assisting with this series!

Join us to Learn More About WebRTC in Education

Education and E-learning are one of the largest market niches that are adopting WebRTC.

It probably has to do with the no-fuss approach that WebRTC has, coupled with the ability to hook it up to different business processes. This enables education and LMS vendors to integrate WebRTC into their products directly, reducing the need to ask customers to install 3rd party apps or having to deal with multiple systems.

What we’ve seen at testRTC is a large swath of education use cases:

  • Private 1:1 tutoring lessons
  • Class-type systems, where a single teacher facilitates the learning of multiple students
  • Webinar-type services, where a few active participants get broadcasted to a larger audience
  • MOOC (Massive Open Online Course)
  • Marketplace systems, brandable sites and widgets, aggerators of courses

We’d like to share our experiences with you and show you some of these use cases and the challenges they bring to developers of such systems.

Join our Webinar on WebRTC in Education

Join us on Wednesday, December 14 at 14:30 EDT to learn more about this fascinating new frontier in real time education.

If you already have questions for us – just register to the event and place your questions on the registration page – these questions will be saved until the webinar itself.

Reserve your spot now