
Earlier this week, we hosted our first webinar in 2019, something we hope to do a lot more (once a month if we can keep it up). This time, we focused on network behavior of SFU media servers.
One of the things we’ve seen with our customers is that different SFUs differ a lot in how they behave. You might not see that much when the network is just fine, but when things get tough, that’s when this will be noticed. This is why we decided to dedicate our first webinar this year to this topic.
There was another reason, and that’s the fact that testRTC is built to cater exactly to these situations, where controlling and configuring network conditions is something you want to do. We’ve built into testRTC 4 main capabilities to give you that:
#1 – Location of the probes
With testRTC, you can decide where you want the probes in your test to launch from.
You can use multiple locations for the same test, and we’re spread wider than what you see in the default UI (we give more locations and better granularity for enterprise customers, based on their needs).
Here’s how it looks like when you test and launch a plan:

In the above scenario, I decided to use probes coming from West US and Europe locations.
Here’s how I’ve spread a 16-browsers test in the webinar yesterday:
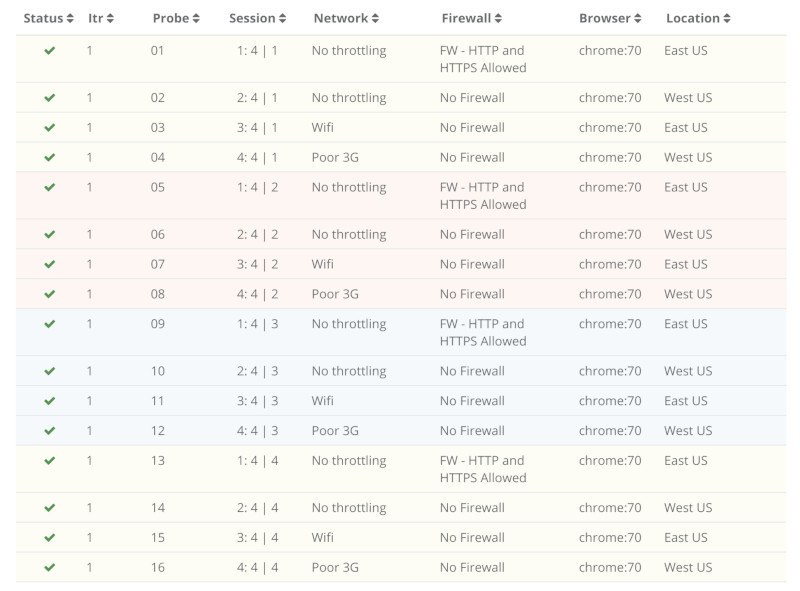
This allows you to test your service from different locations and see how well you’ve got your infrastructure laid out across the world to meet the needs of your customers.
It also brings us to the next two capabilities, since I also configured different networks and firewalls there:
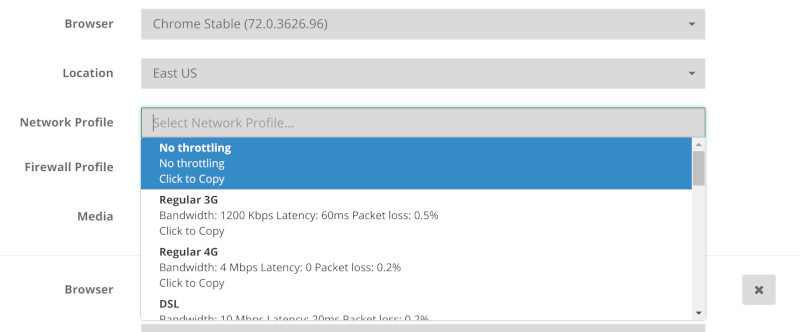
#2 – Configuration of the probe’s network
Need to check over Wifi? 3G? 4G? Add some packet loss to the network indicating you want a bad 4G network connection? How about ADSL?
We’ve got that pre-configured and ready in a drop down for you.
I showed how this plays out when using various services online.
#3 – Configuration of the probe’s firewall
You can also force all media to be relayed via TURN servers by blocking UDP traffic or even block everything that isn’t port 443.
This immediately gives you 3 things:
- Know if you’ve got TURN configured properly
- The ability to stress test your TURN servers
- See what happens when media gets routed over TCP (it is ugly)
#4 – Dynamically controlling the probe’s network conditions
Sometimes what you want is to dynamically change network conditions. The team at Jitsi dabbled with that when they looked at Zoom (I’ve written about it on BlogGeek.me).
We do that using a script command in testRTC called .rtcSetNetworkProfile() which I’ve used during the webinar – what I did was this:
- Have multiple users join the same room
- They all stay in the room for 120 seconds
- The first user gets throttled down to 400kbps on his network after 30 seconds
- That lasts for 20 seconds, and then he goes back to “normal”
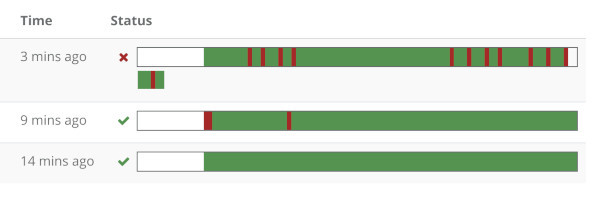
It looks something like this when see from one of the other user’s graphs:

The red line represents the outgoing bitrate, which is just fine – it runs in front of the SFU and there’s no disturbance there on the network. The blue line drops down to almost zero. And takes some time to recuperate.
The webinar and demo
Most of the webinar was a long demo session. You can view it all here:
You can open up your own testRTC account and play with our service a bit under evaluation.
Our next webinar – monitoring
Here’s a kicker – I’ve started working on our next webinar about a month ago. It was to do with monitoring and the things we can do there. I even have 3 monitors running for that purpose only for a month now:
That first one with the reds in it? That’s AppRTC… and it failed. At the time that we did our webinar on network testing. And I planned to use it to show some things. So I reverted to showing results of test runs from a day earlier.
Anyways, monitoring is what our next webinar is about.
I am going to show you how to set it up and how to connect it to third party services. In this case, it will be Zapier and Google Sheet where more analysis will take place.